

Products
Manual
How to Maintain 2 Way Stainless Steel Bottle


Introduction on how to maintain MIKI HOUSE 2 Way Stainless Steel Bottle. To learn more about how to maintain these sets, please see below.
- Stainless Steel Bottle (15-4164-146)
- Part Names
- How to Attach/Detach Shoulder Belt
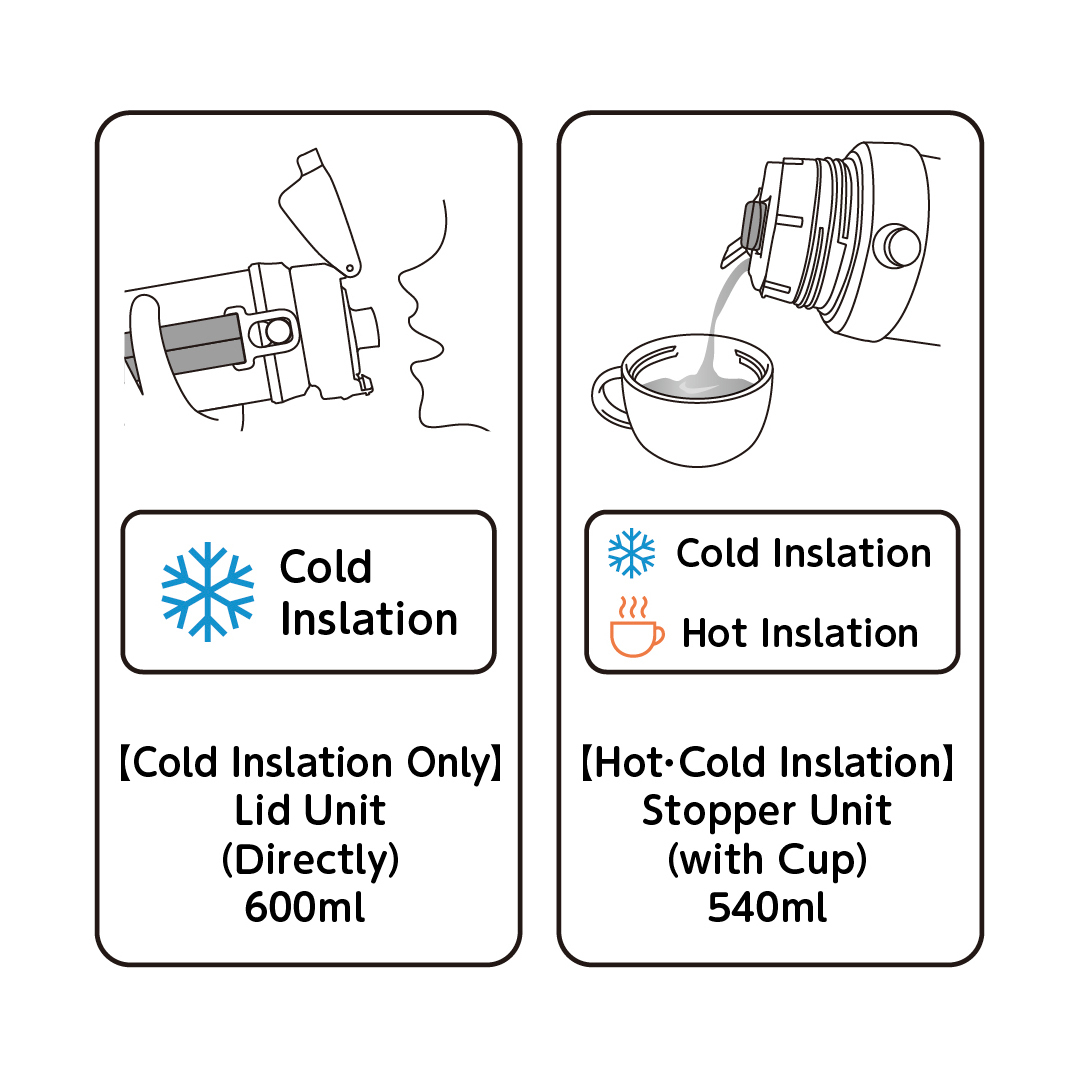
- [Heat/Cold Insulation] Drinking with Cup (Stopper Unit)
- [Cold Insulation Only] Drinking Directly (Lid Unit)
- Warnings for Usage
- How to Maintain Product
- Warnings for Maintenance
- Q&A
- Purchasing Parts
- Heat/Cold Insulation
- Raw Resin and Materials Used
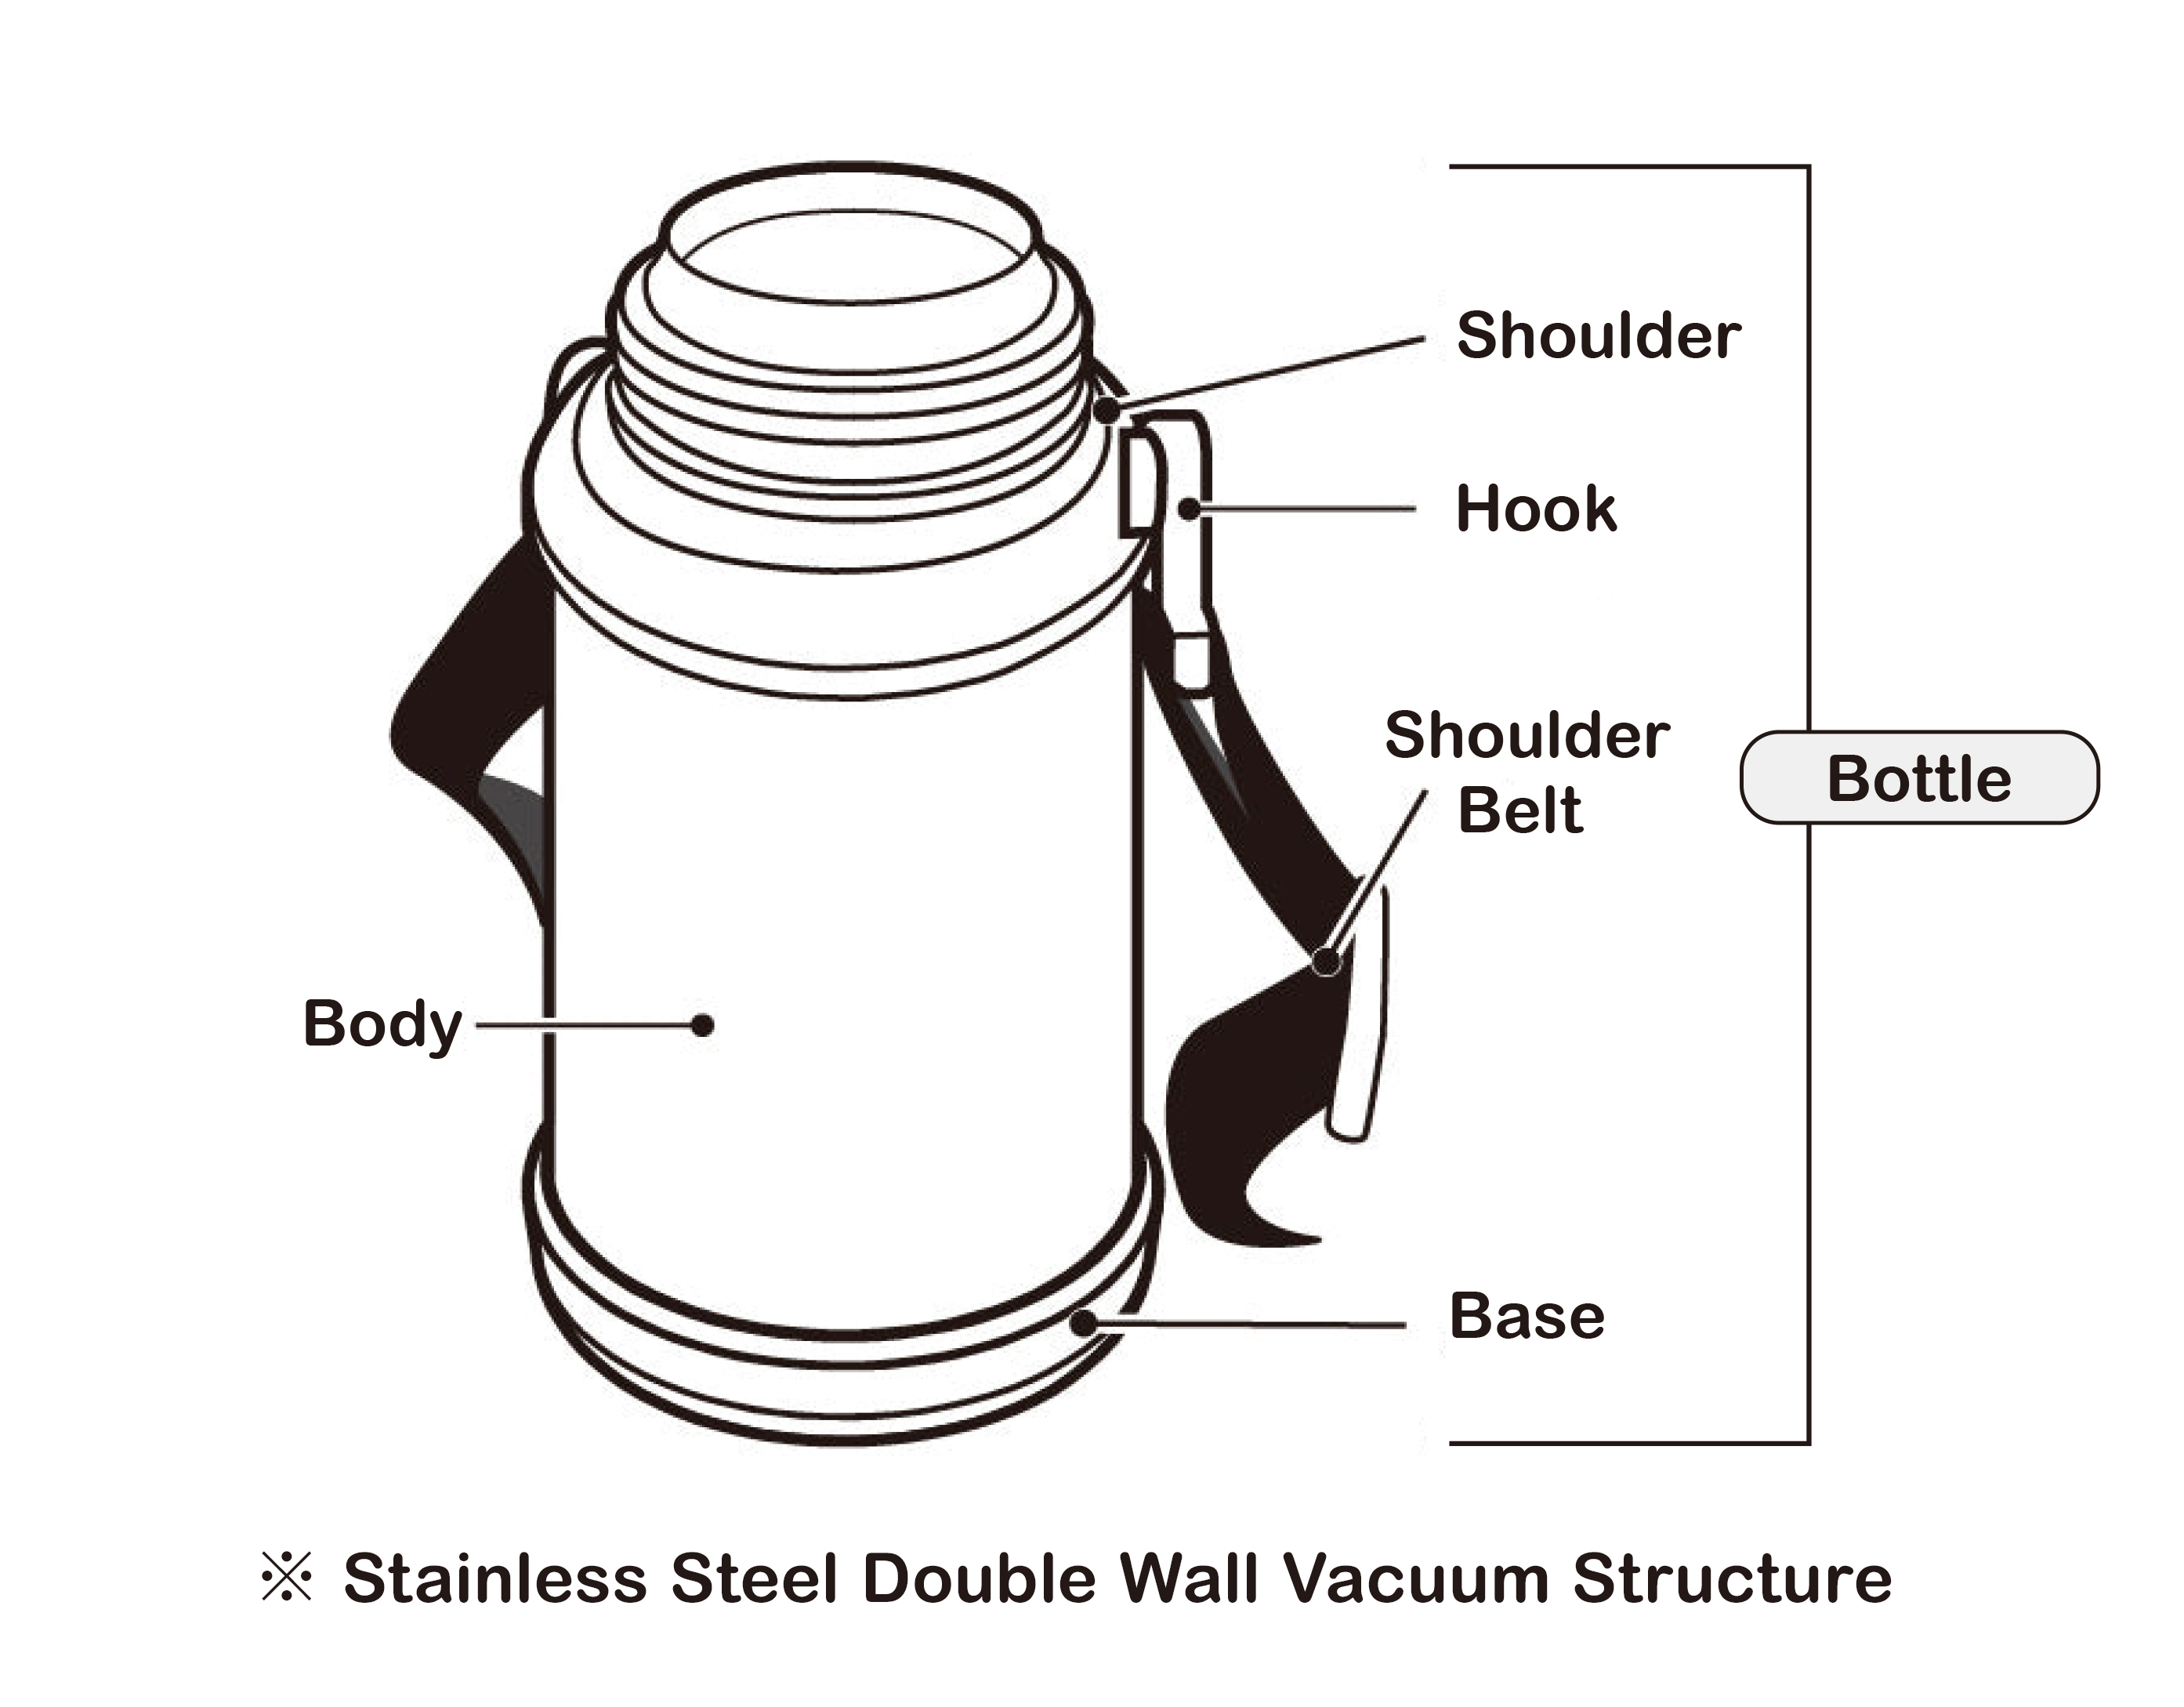
Stainless Steel Bottle (15-4164-146)
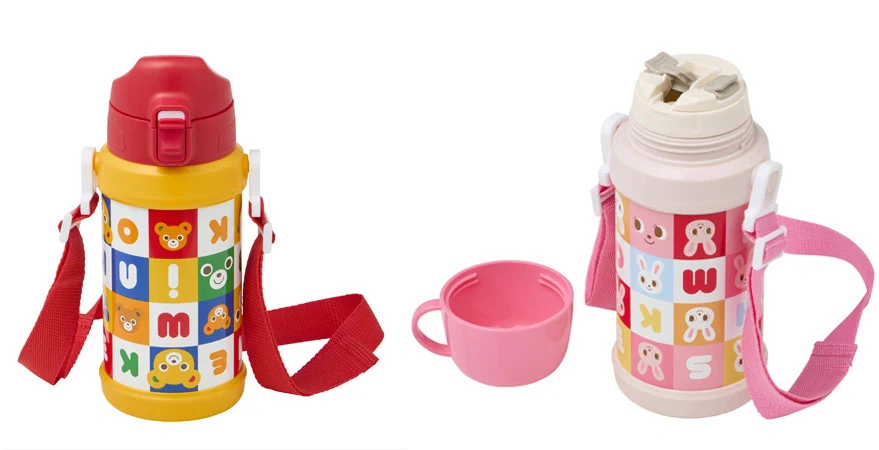
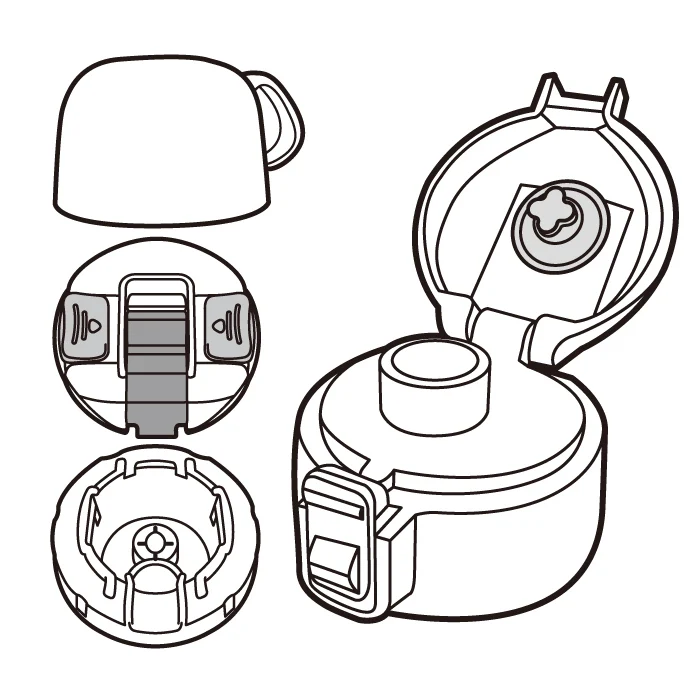
Part Names
Please check that all parts are accounted for before use.
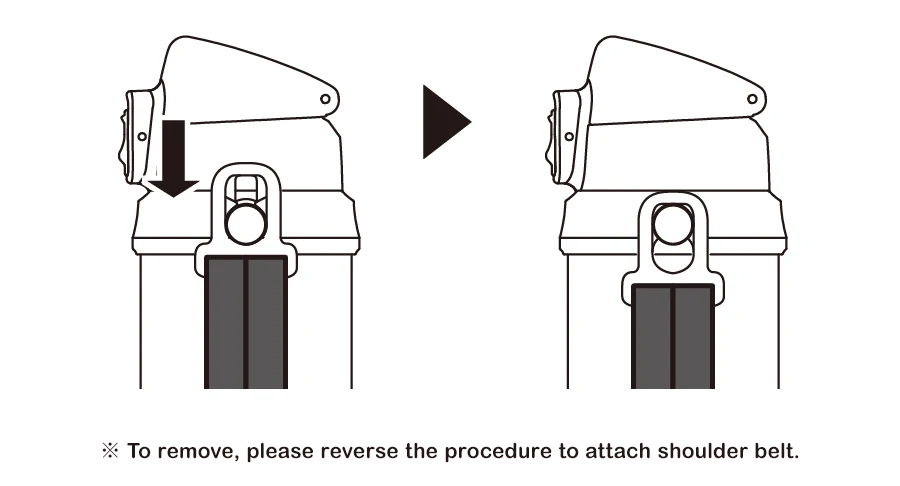
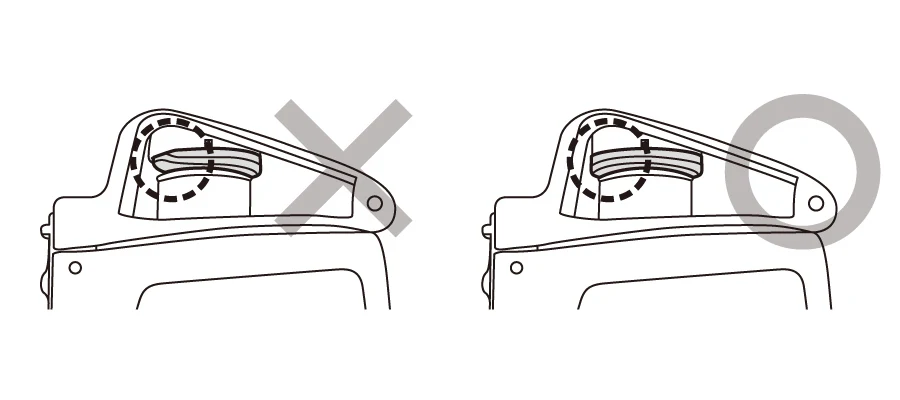
How to Attach/Detach Shoulder Belt
- Latch the hook on to the protrusions of the bottle.
- Pull downwards until you hear a click to ensure it is securely in place.
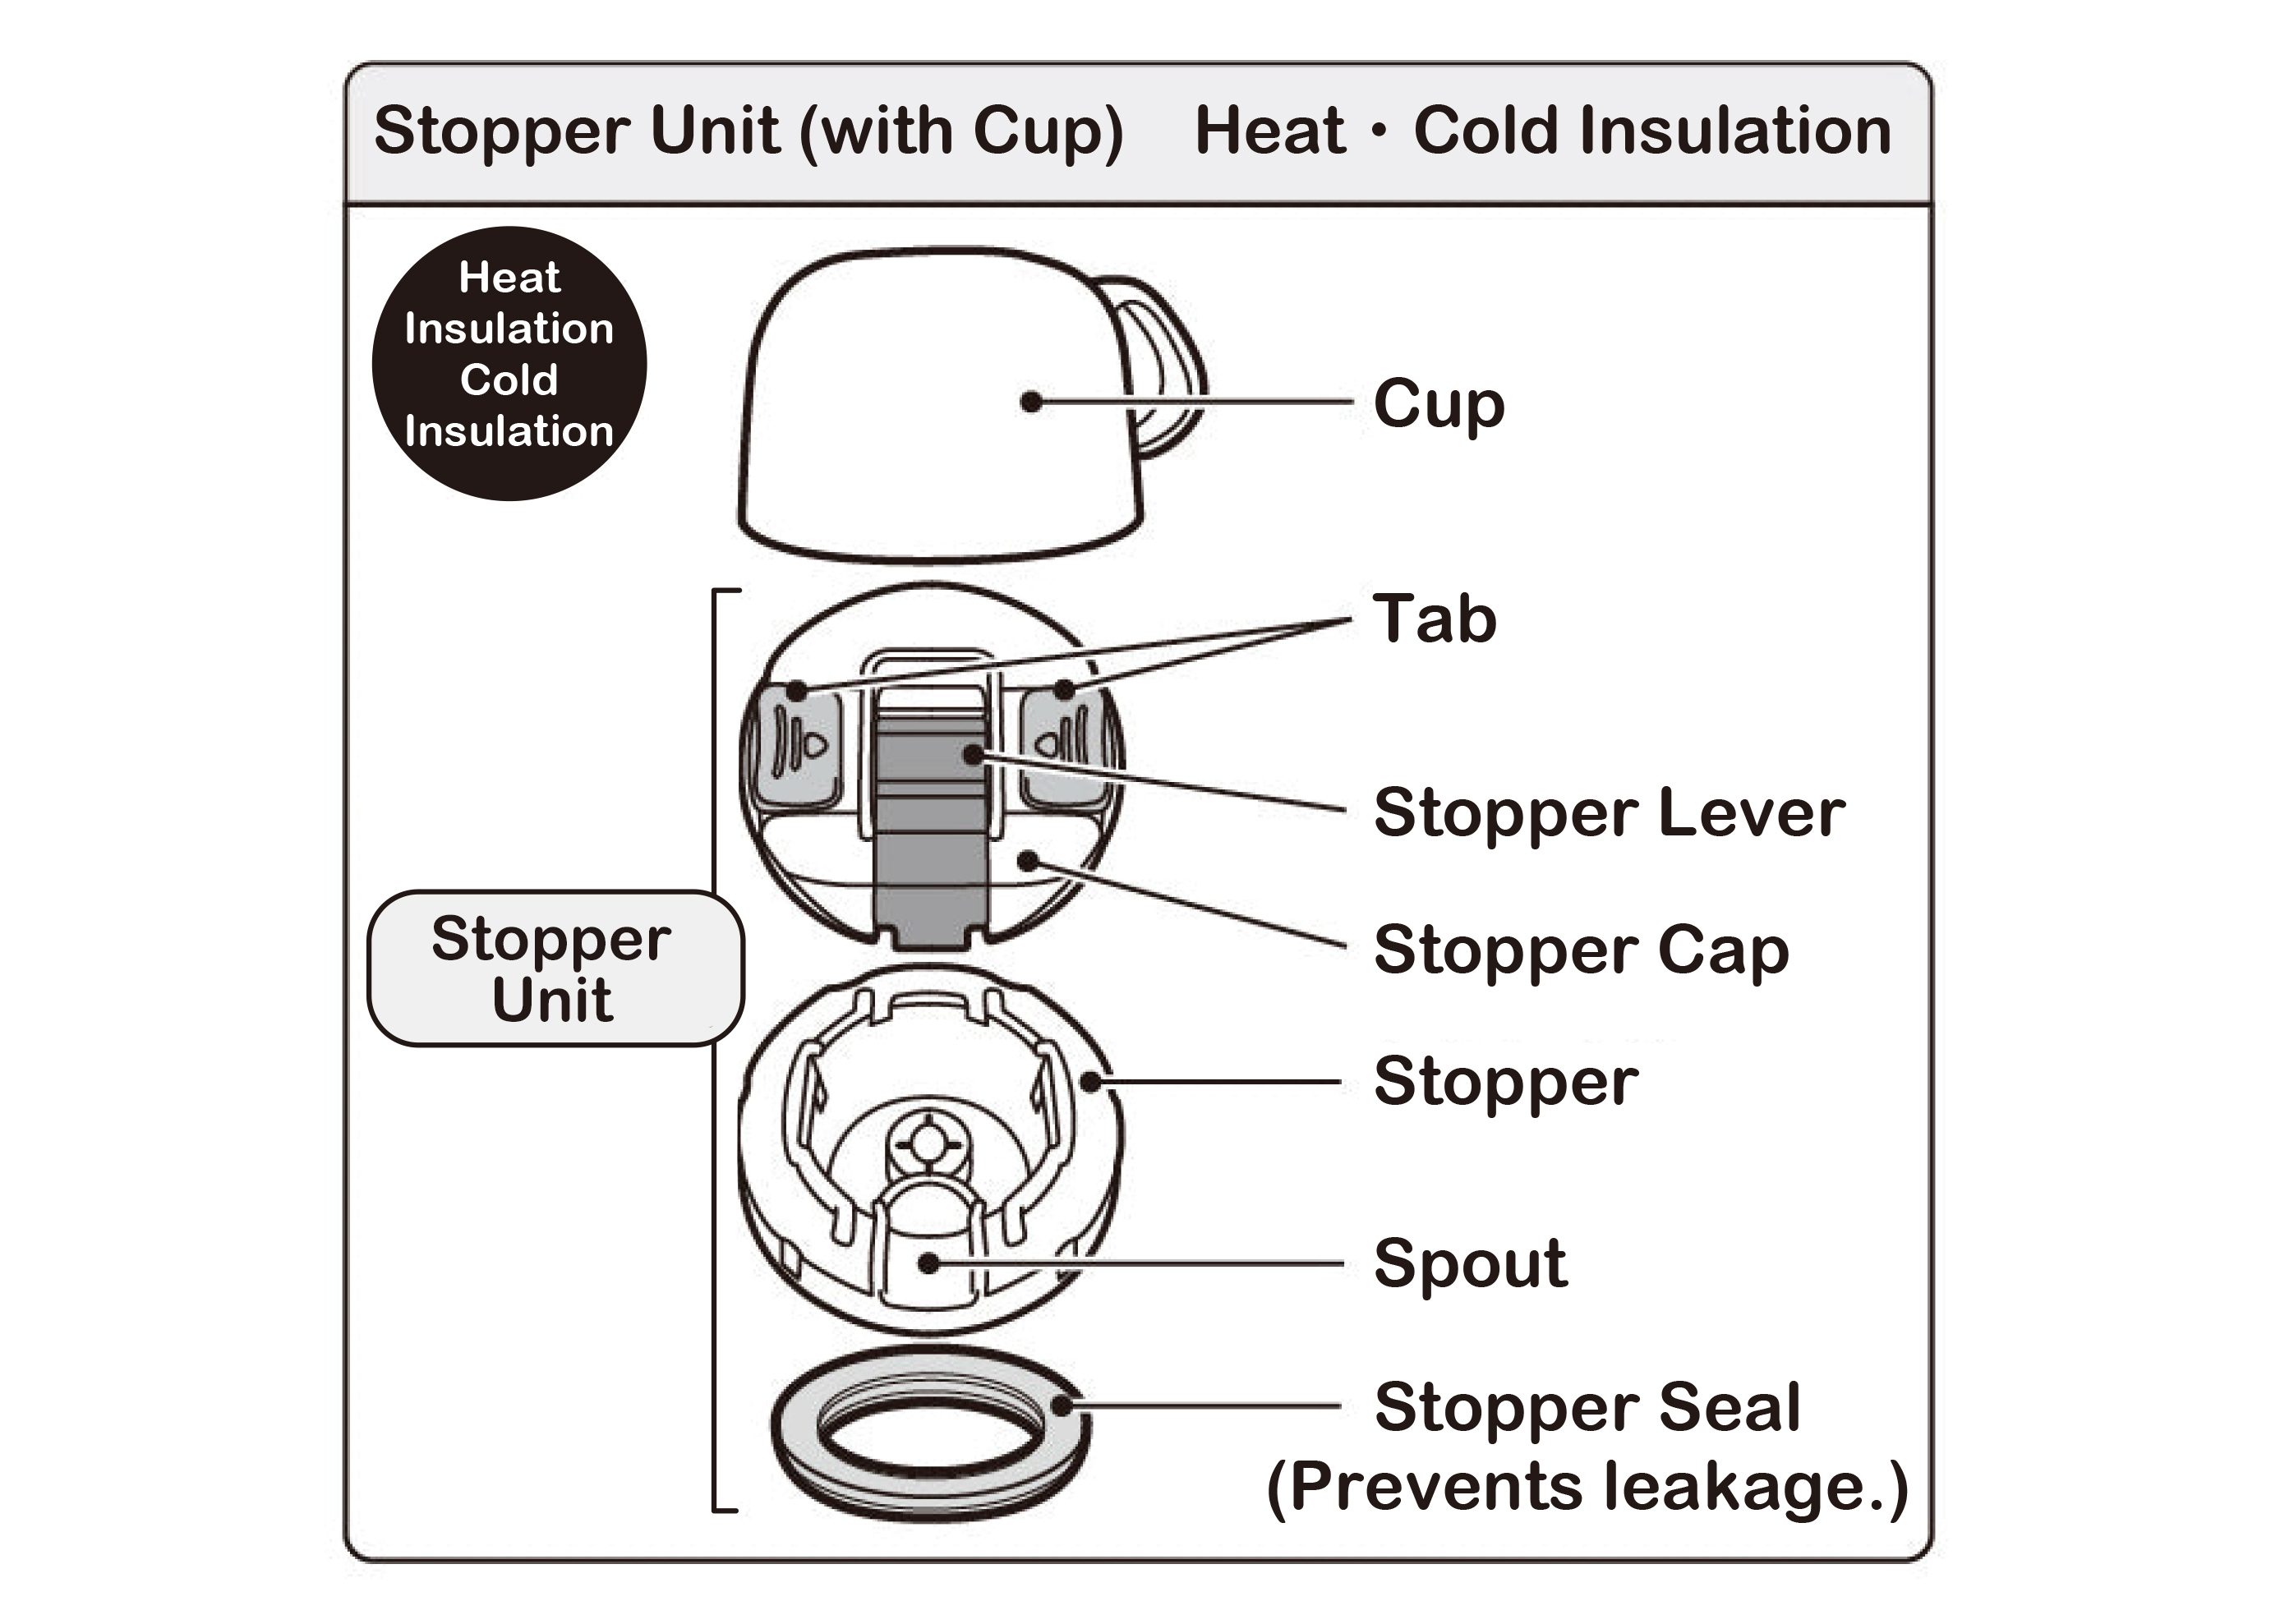
[Heat/Cold Insulation] Drinking with Cup (Stopper Unit)
How to Use Product
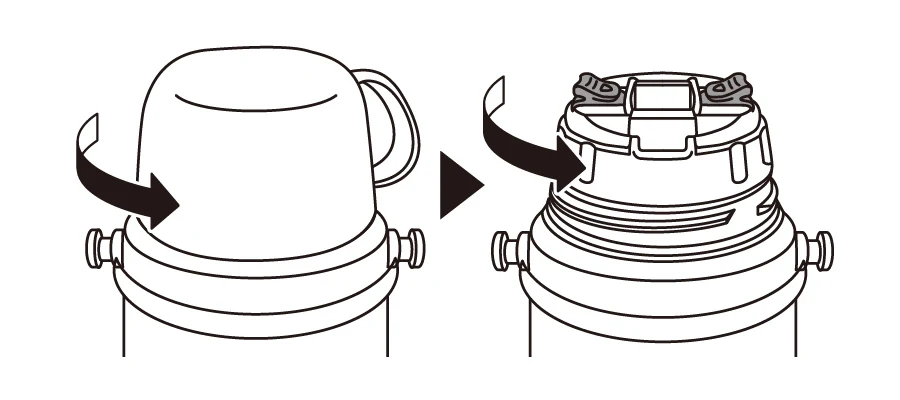
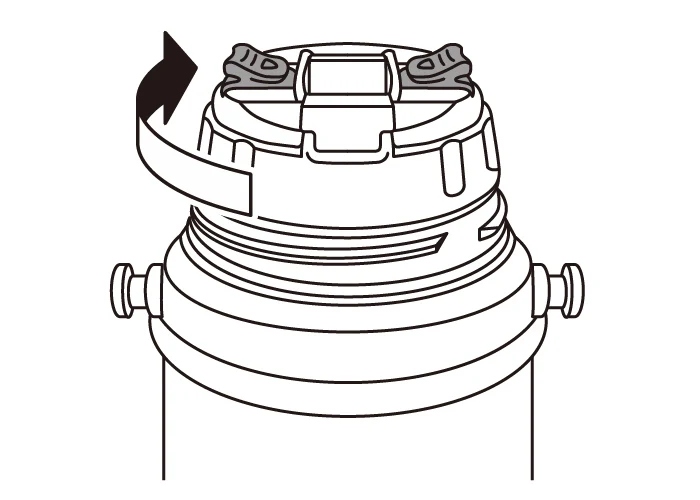
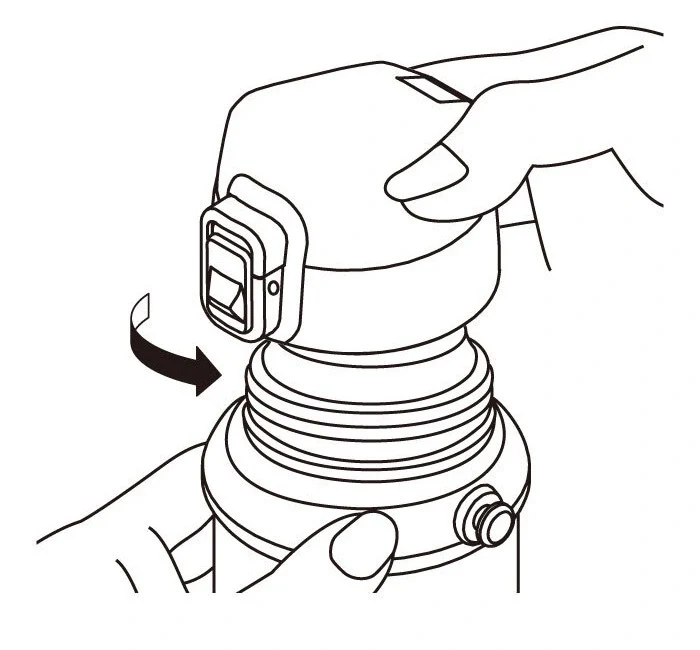
①Remove Cup and Stopper Unit
Twist in direction of arrow to remove.
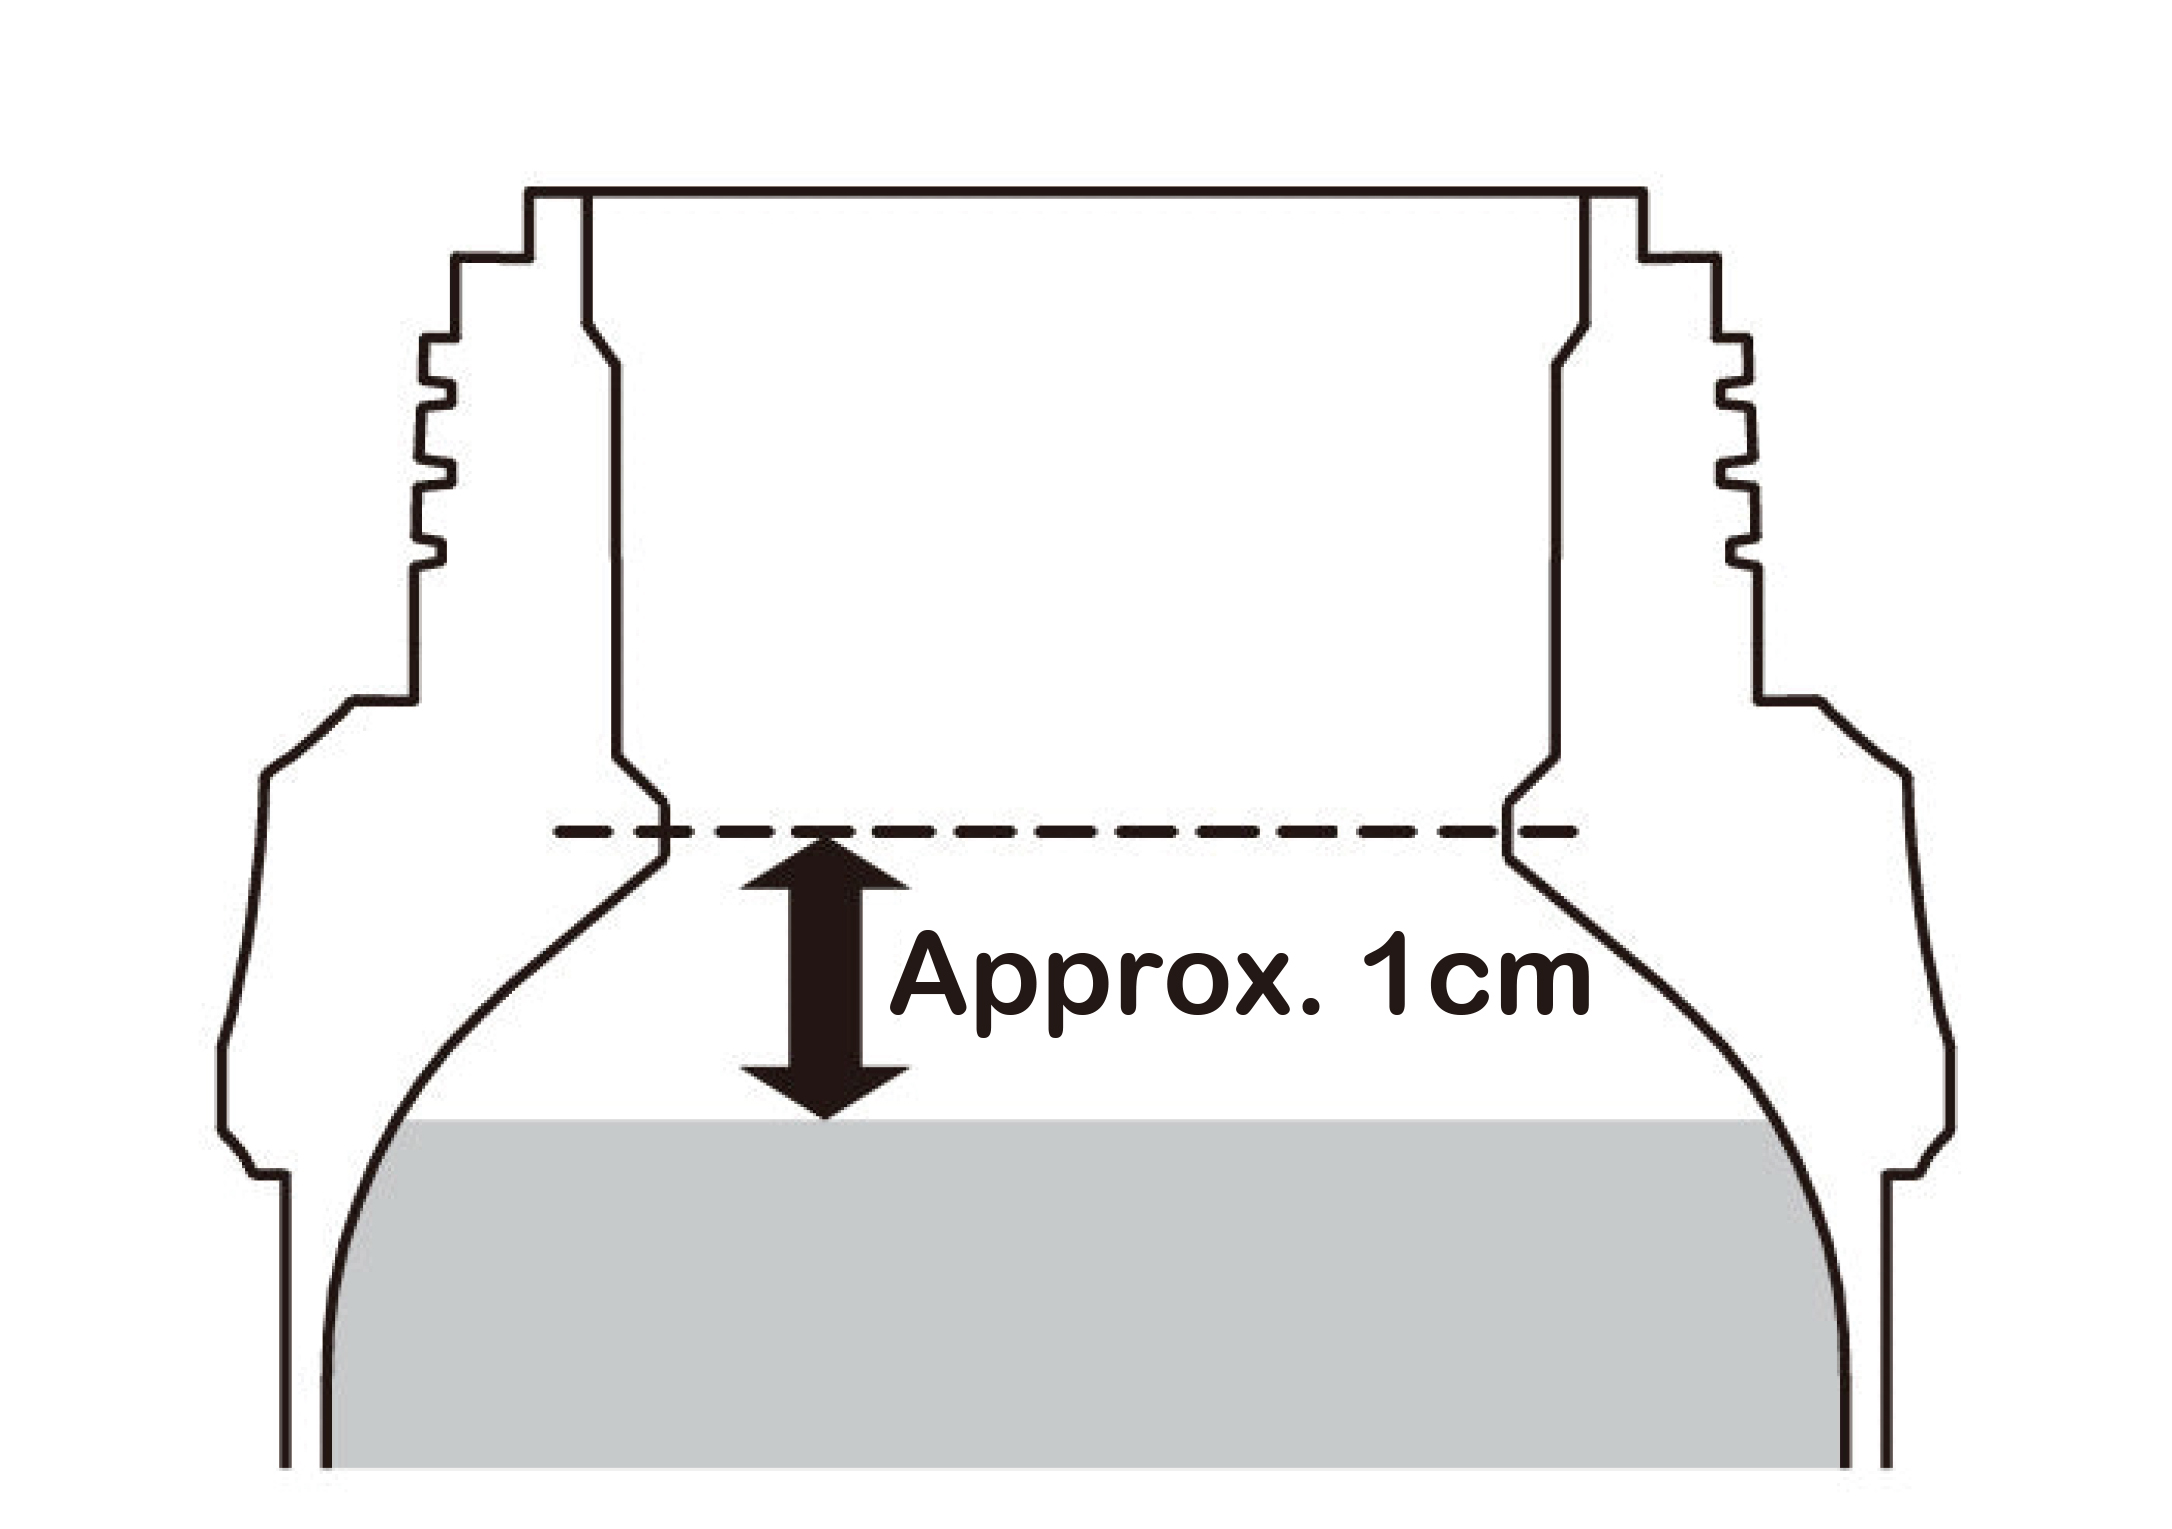
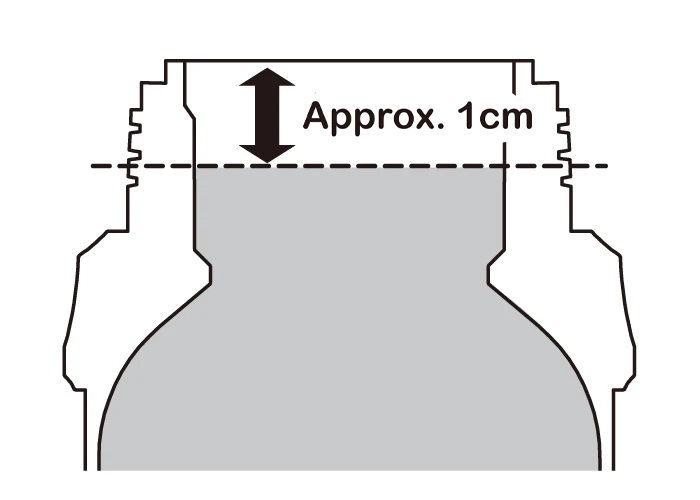
②Fill with Beverage
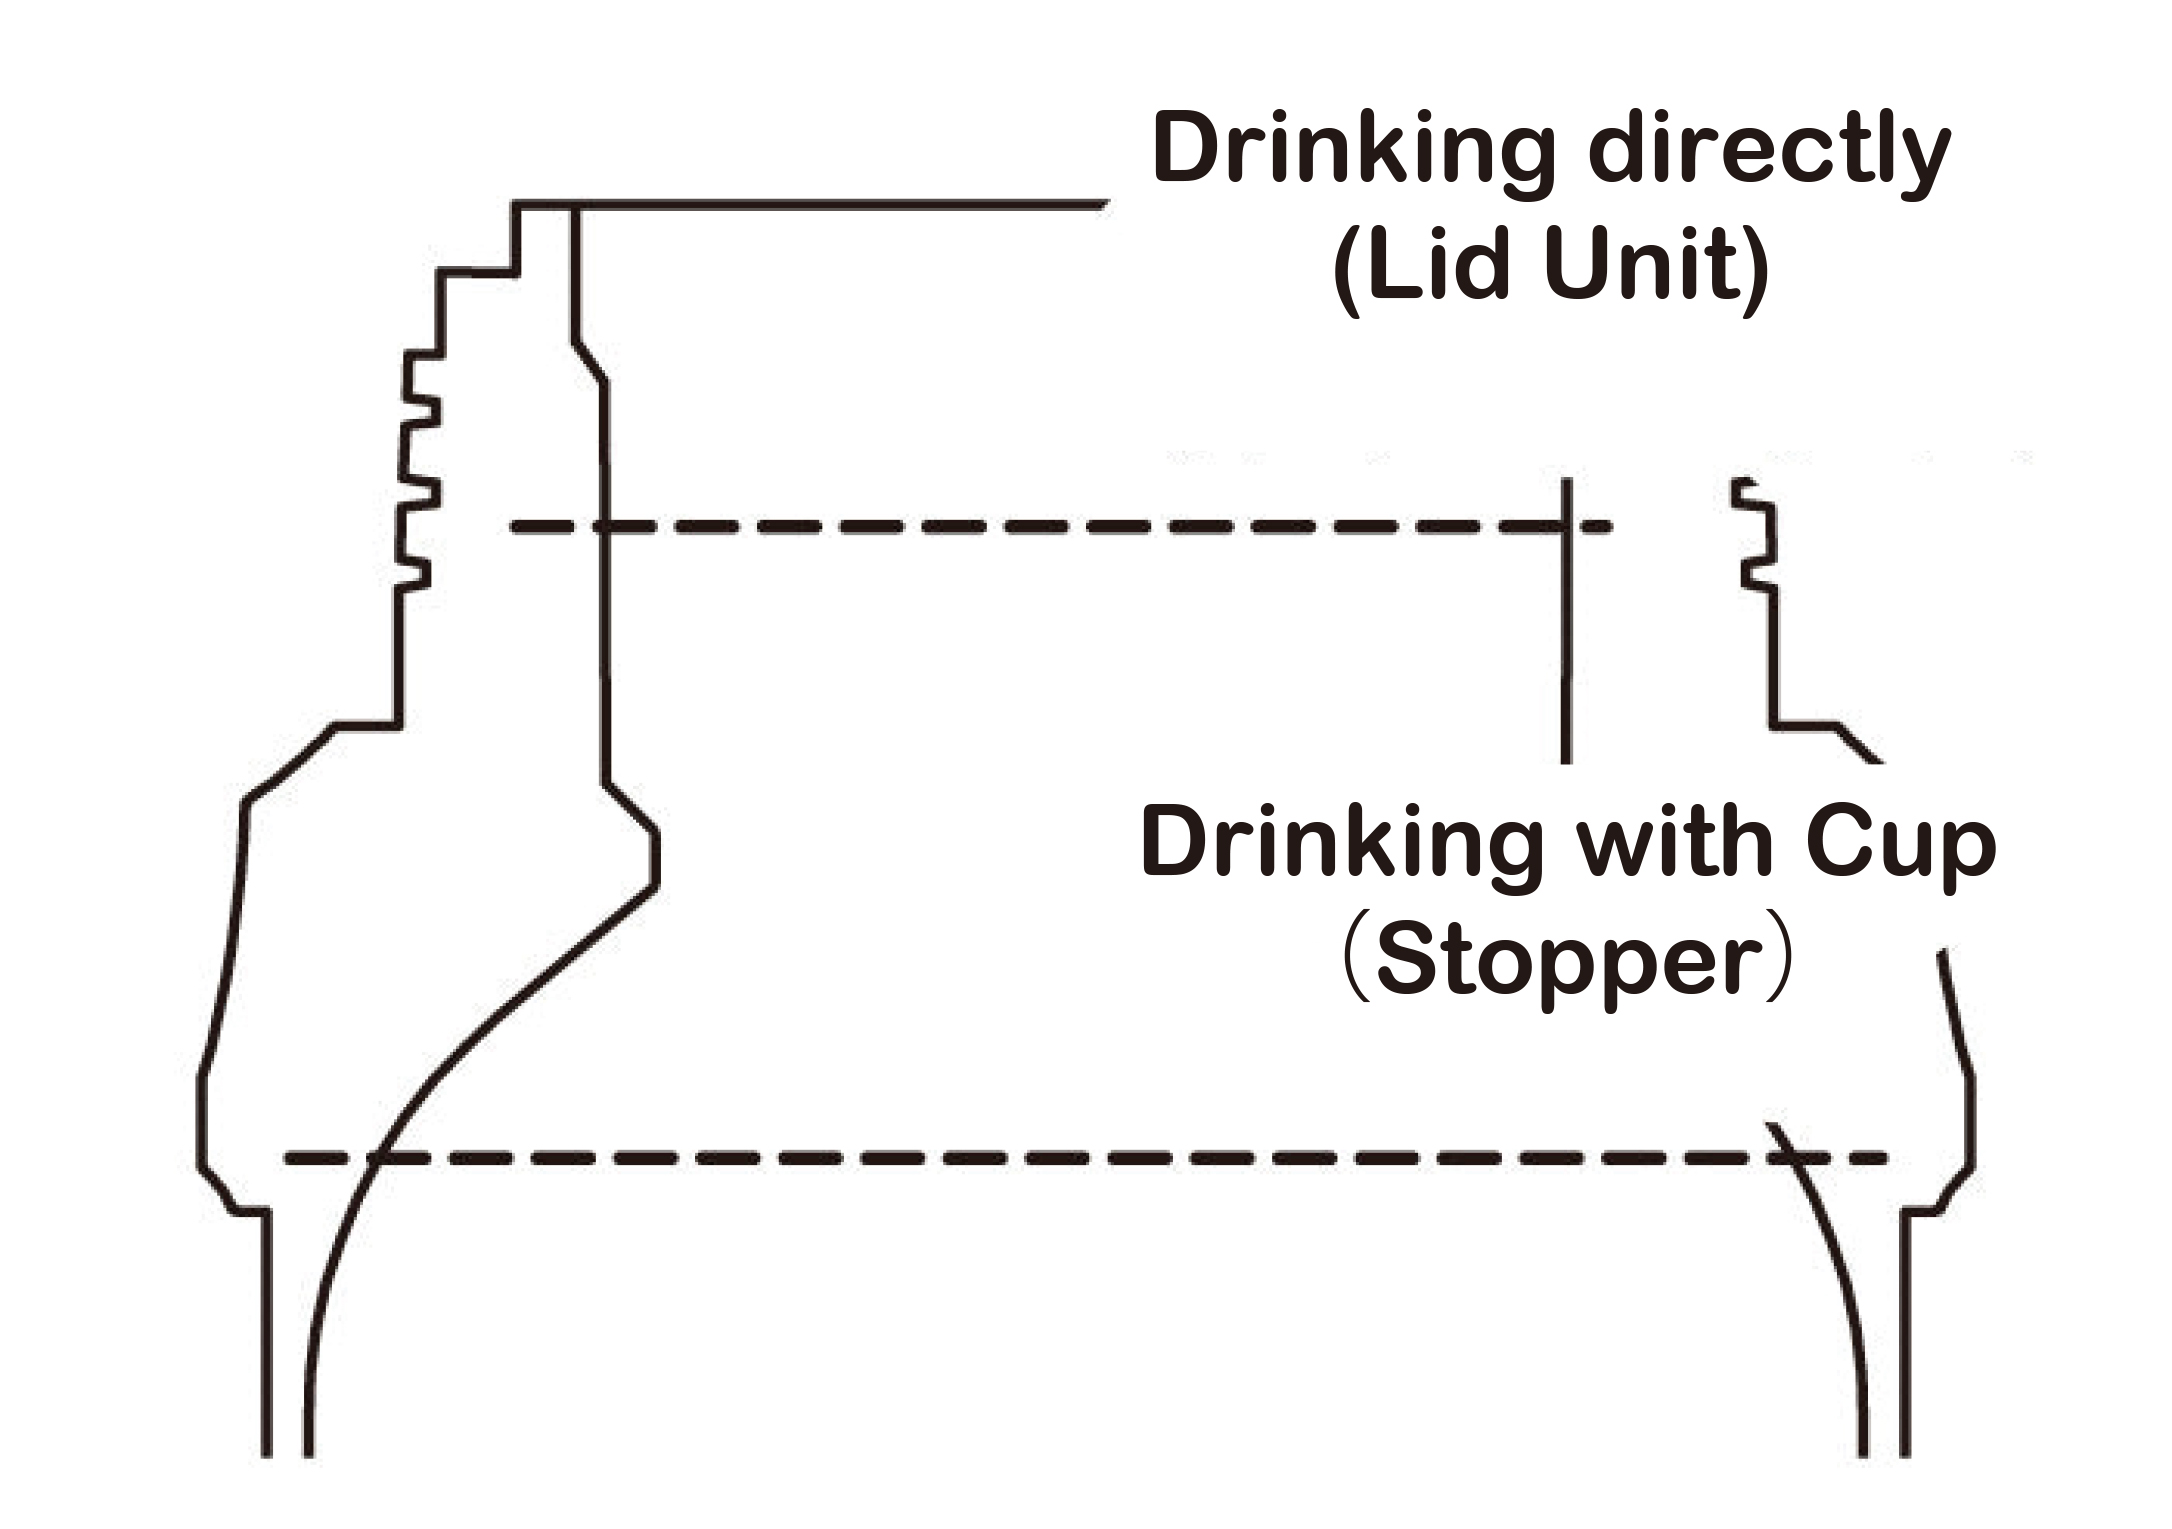
Only fill the bottle to the line shown in the diagram.
Filling above this line may cause the Stopper Unit to become stuck or overflow.
POINT
Add a small amount of warm (cold) water in advance, preheat (pre-cool) for about 1 minute to improve the warm (cold) insulation effect.
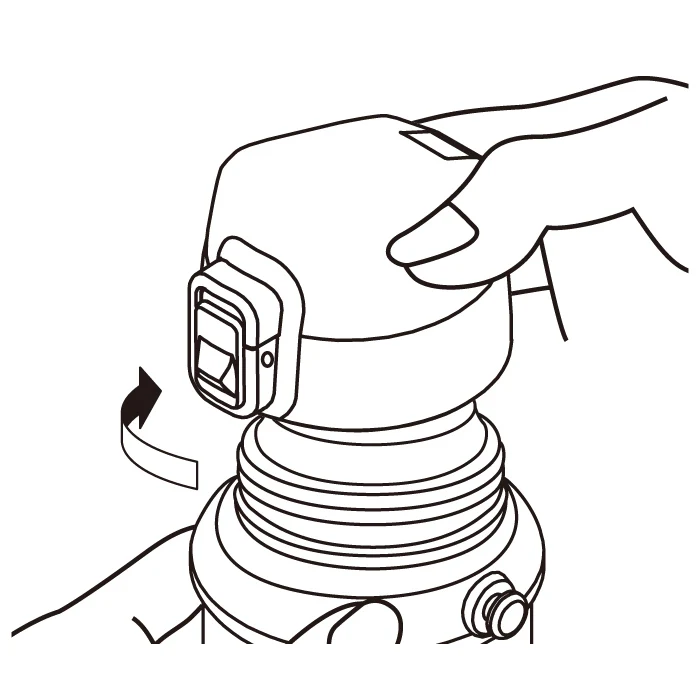
③Close Stopper Unit
While the bottle is upright, twist the Stopper Unit in the direction of the arrow to firmly close.
*Please turn the bottle upside down to ensure there is no leakage.
Warning
Do not tilt or shake the bottle while closing the Stopper Unit.
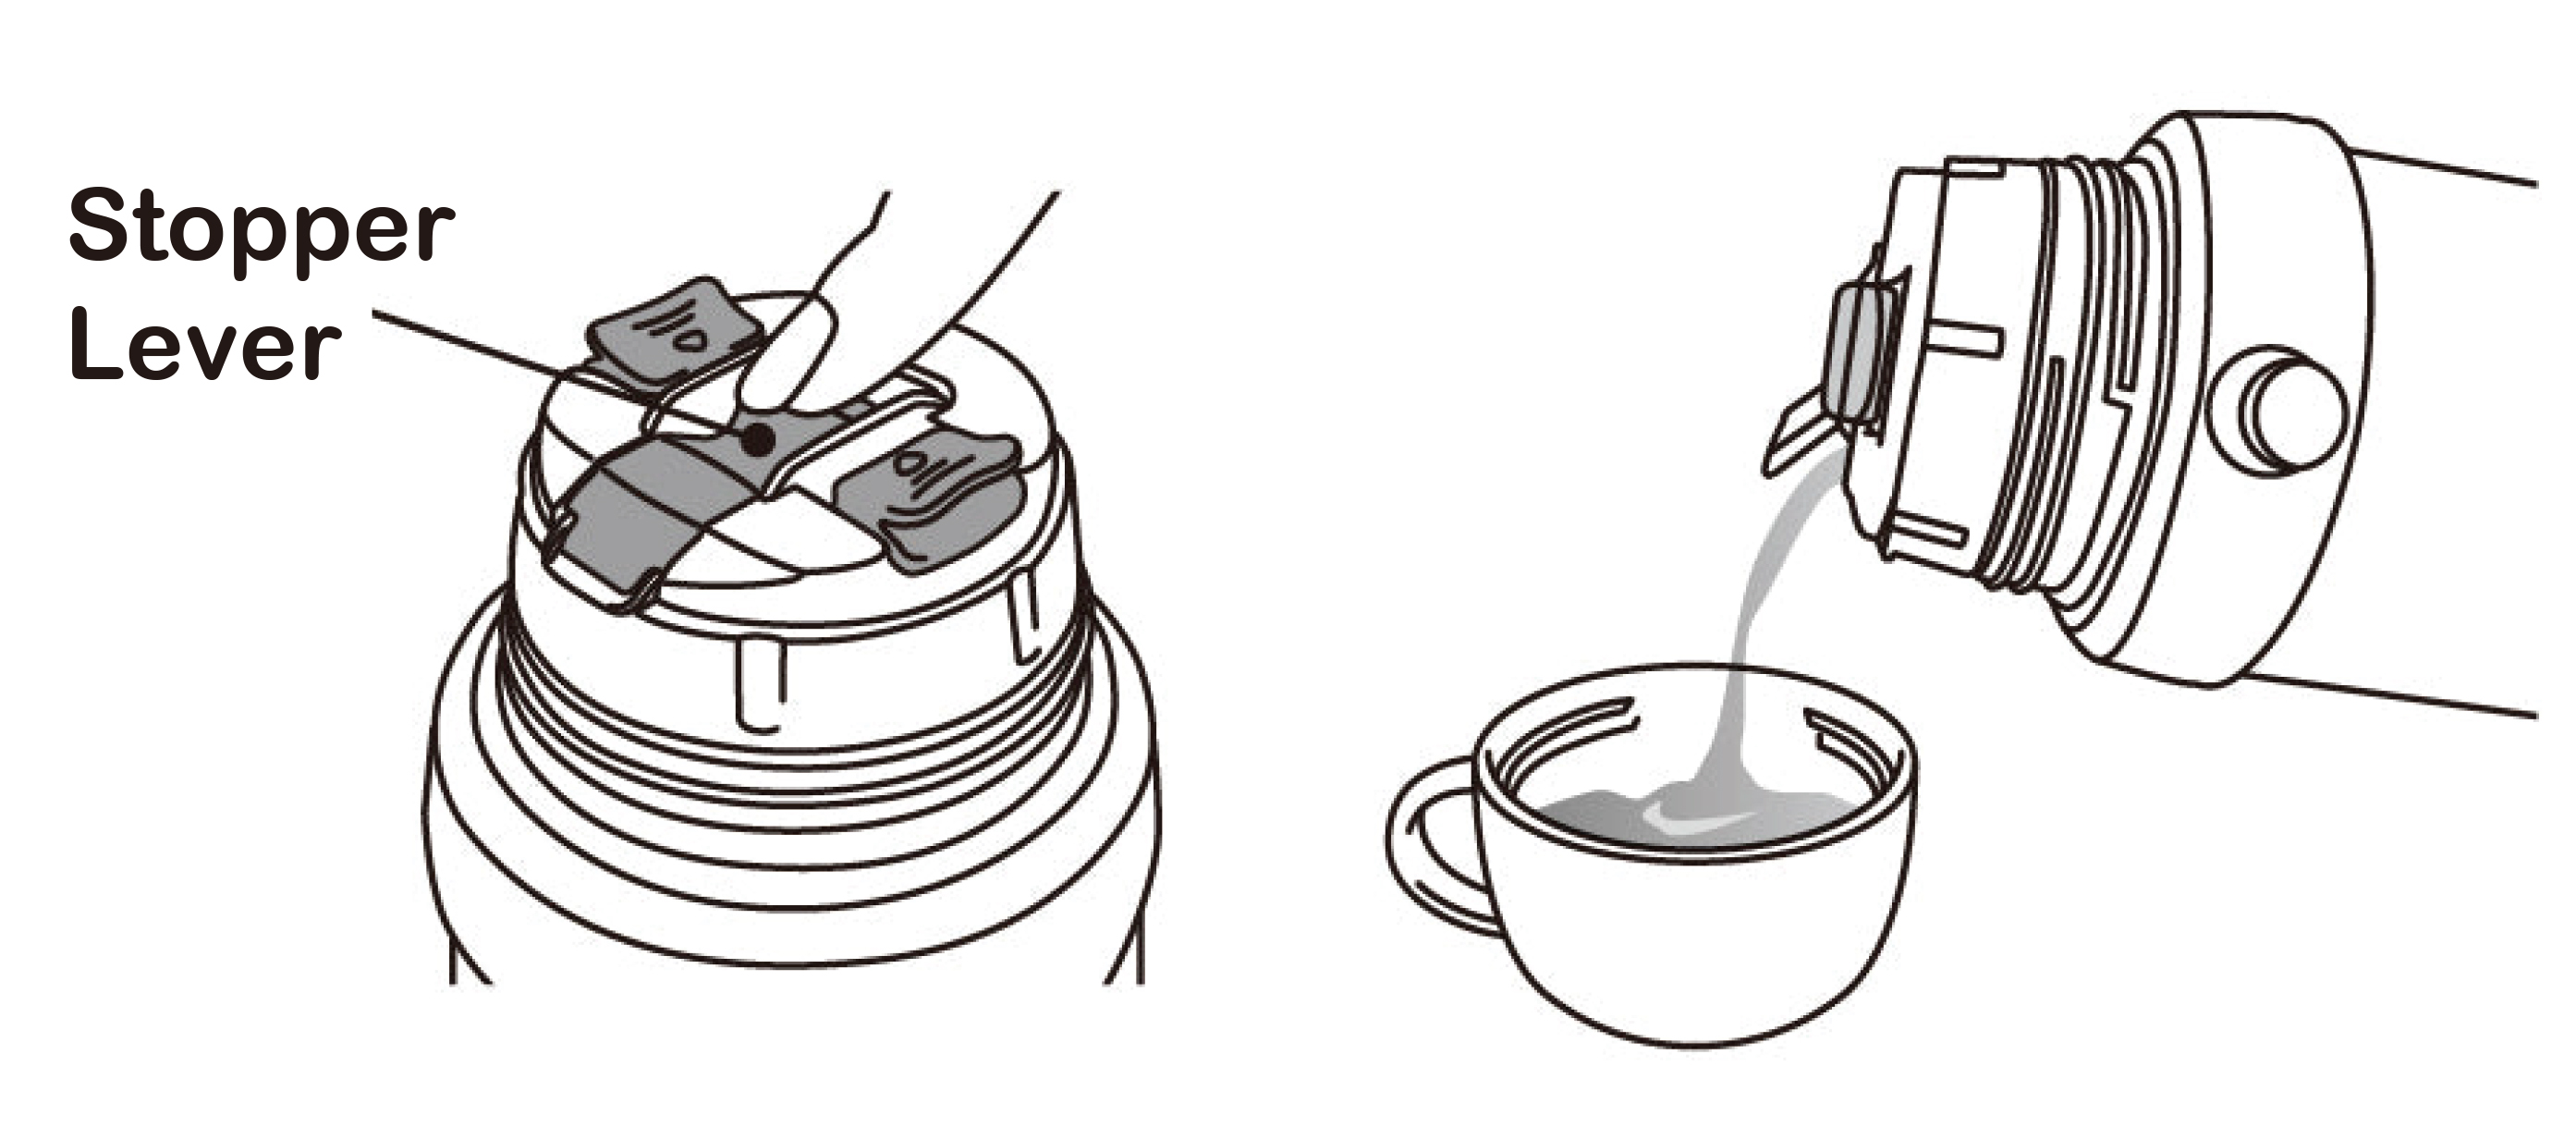
④Pour Beverage
Press down on the Stopper Lever with your finger and tilt towards the Spout to pour.
*Face Spout down to pour correctly.
Warning
Do not tilt or shake the bottle while pressing down on the Stopper Lever.
This may cause the beverage to spill, causing burns or stains.
If the Stopper Lever is stuck, try loosening the Stopper Unit.
Then, press down on the Stopper Lever with your finger while retightening the Stopper Unit with the Spout open.
Warning
Do not drink directly from the Spout.
Please use the Lid Unit to drink directly.
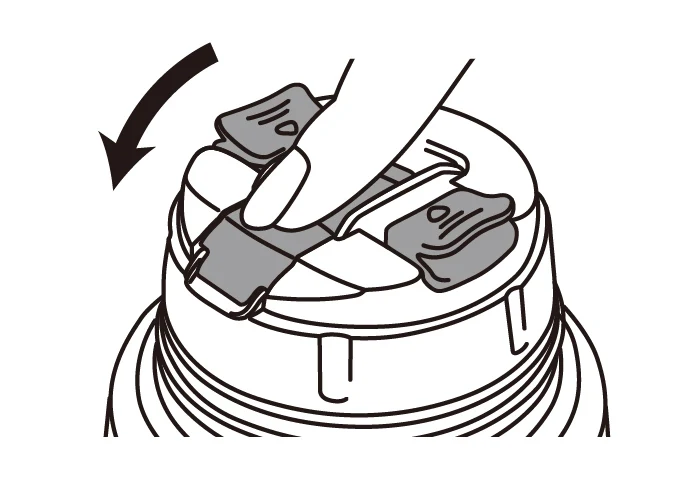
⑤Close
- When closing the Stopper Lever, hold the bottle upright for 2-3 seconds before pressing the Stopper Lever (on the Spout side) to close.
Warning
Do not close the Stopper Lever while the bottle is tilted.
Liquid remaining on the Spout or Stopper Unit may cause leakage.
- Twist the Cup in the direction of the arrow until you hear a click to firmly close.
Warning
Do not leave the Stopper Lever open. This may cause the bottle to tip and spill your beverage, causing burns or stains.
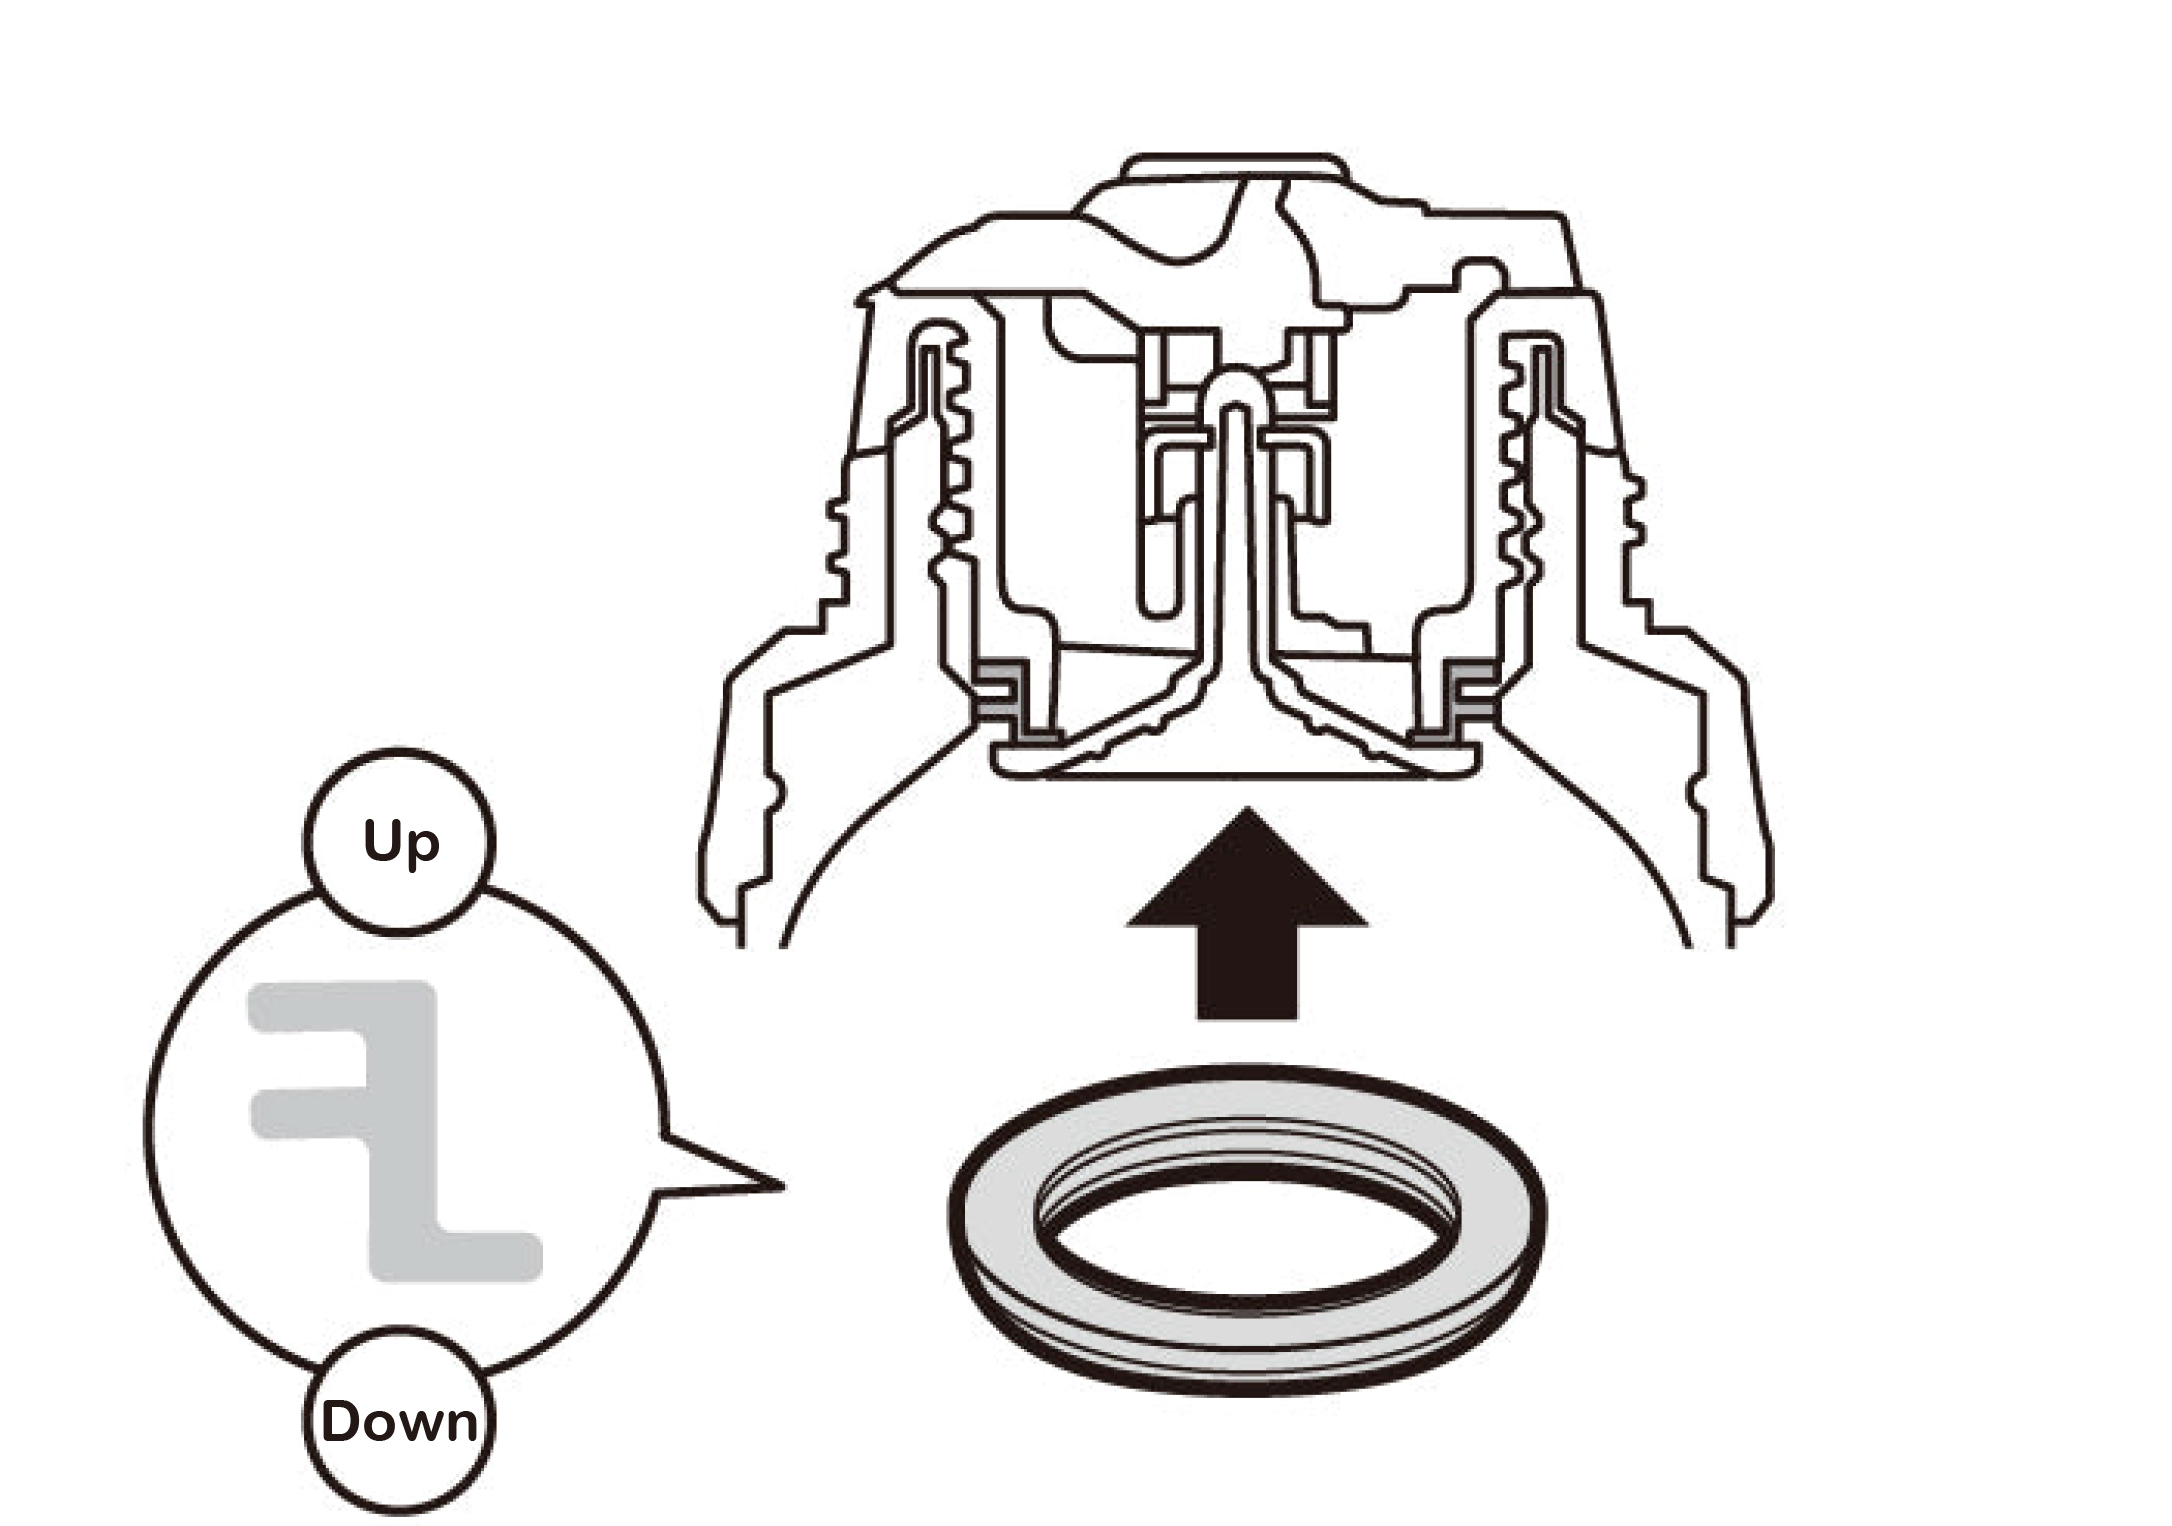
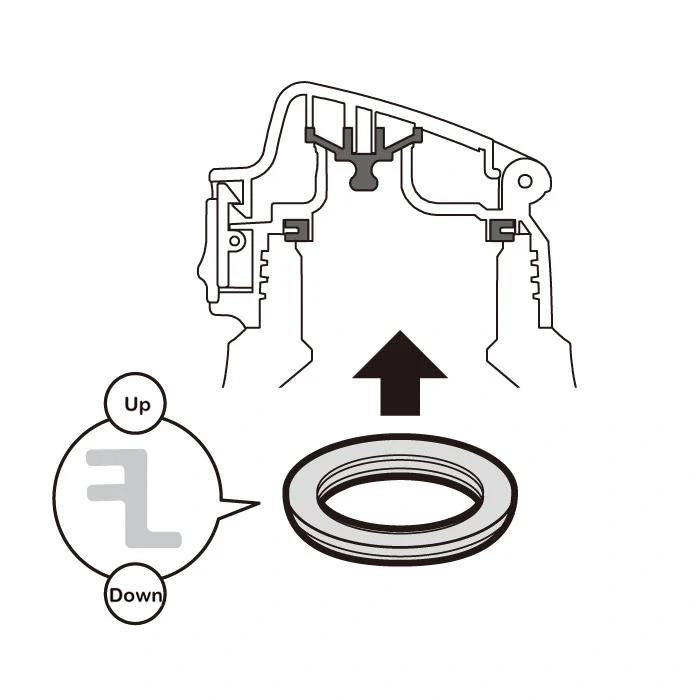
How to Remove and Set the Seal
- Press down on the Stopper Lever and make sure the bottom part of the Stopper Unit is lowered (opened), then remove and set the seal.
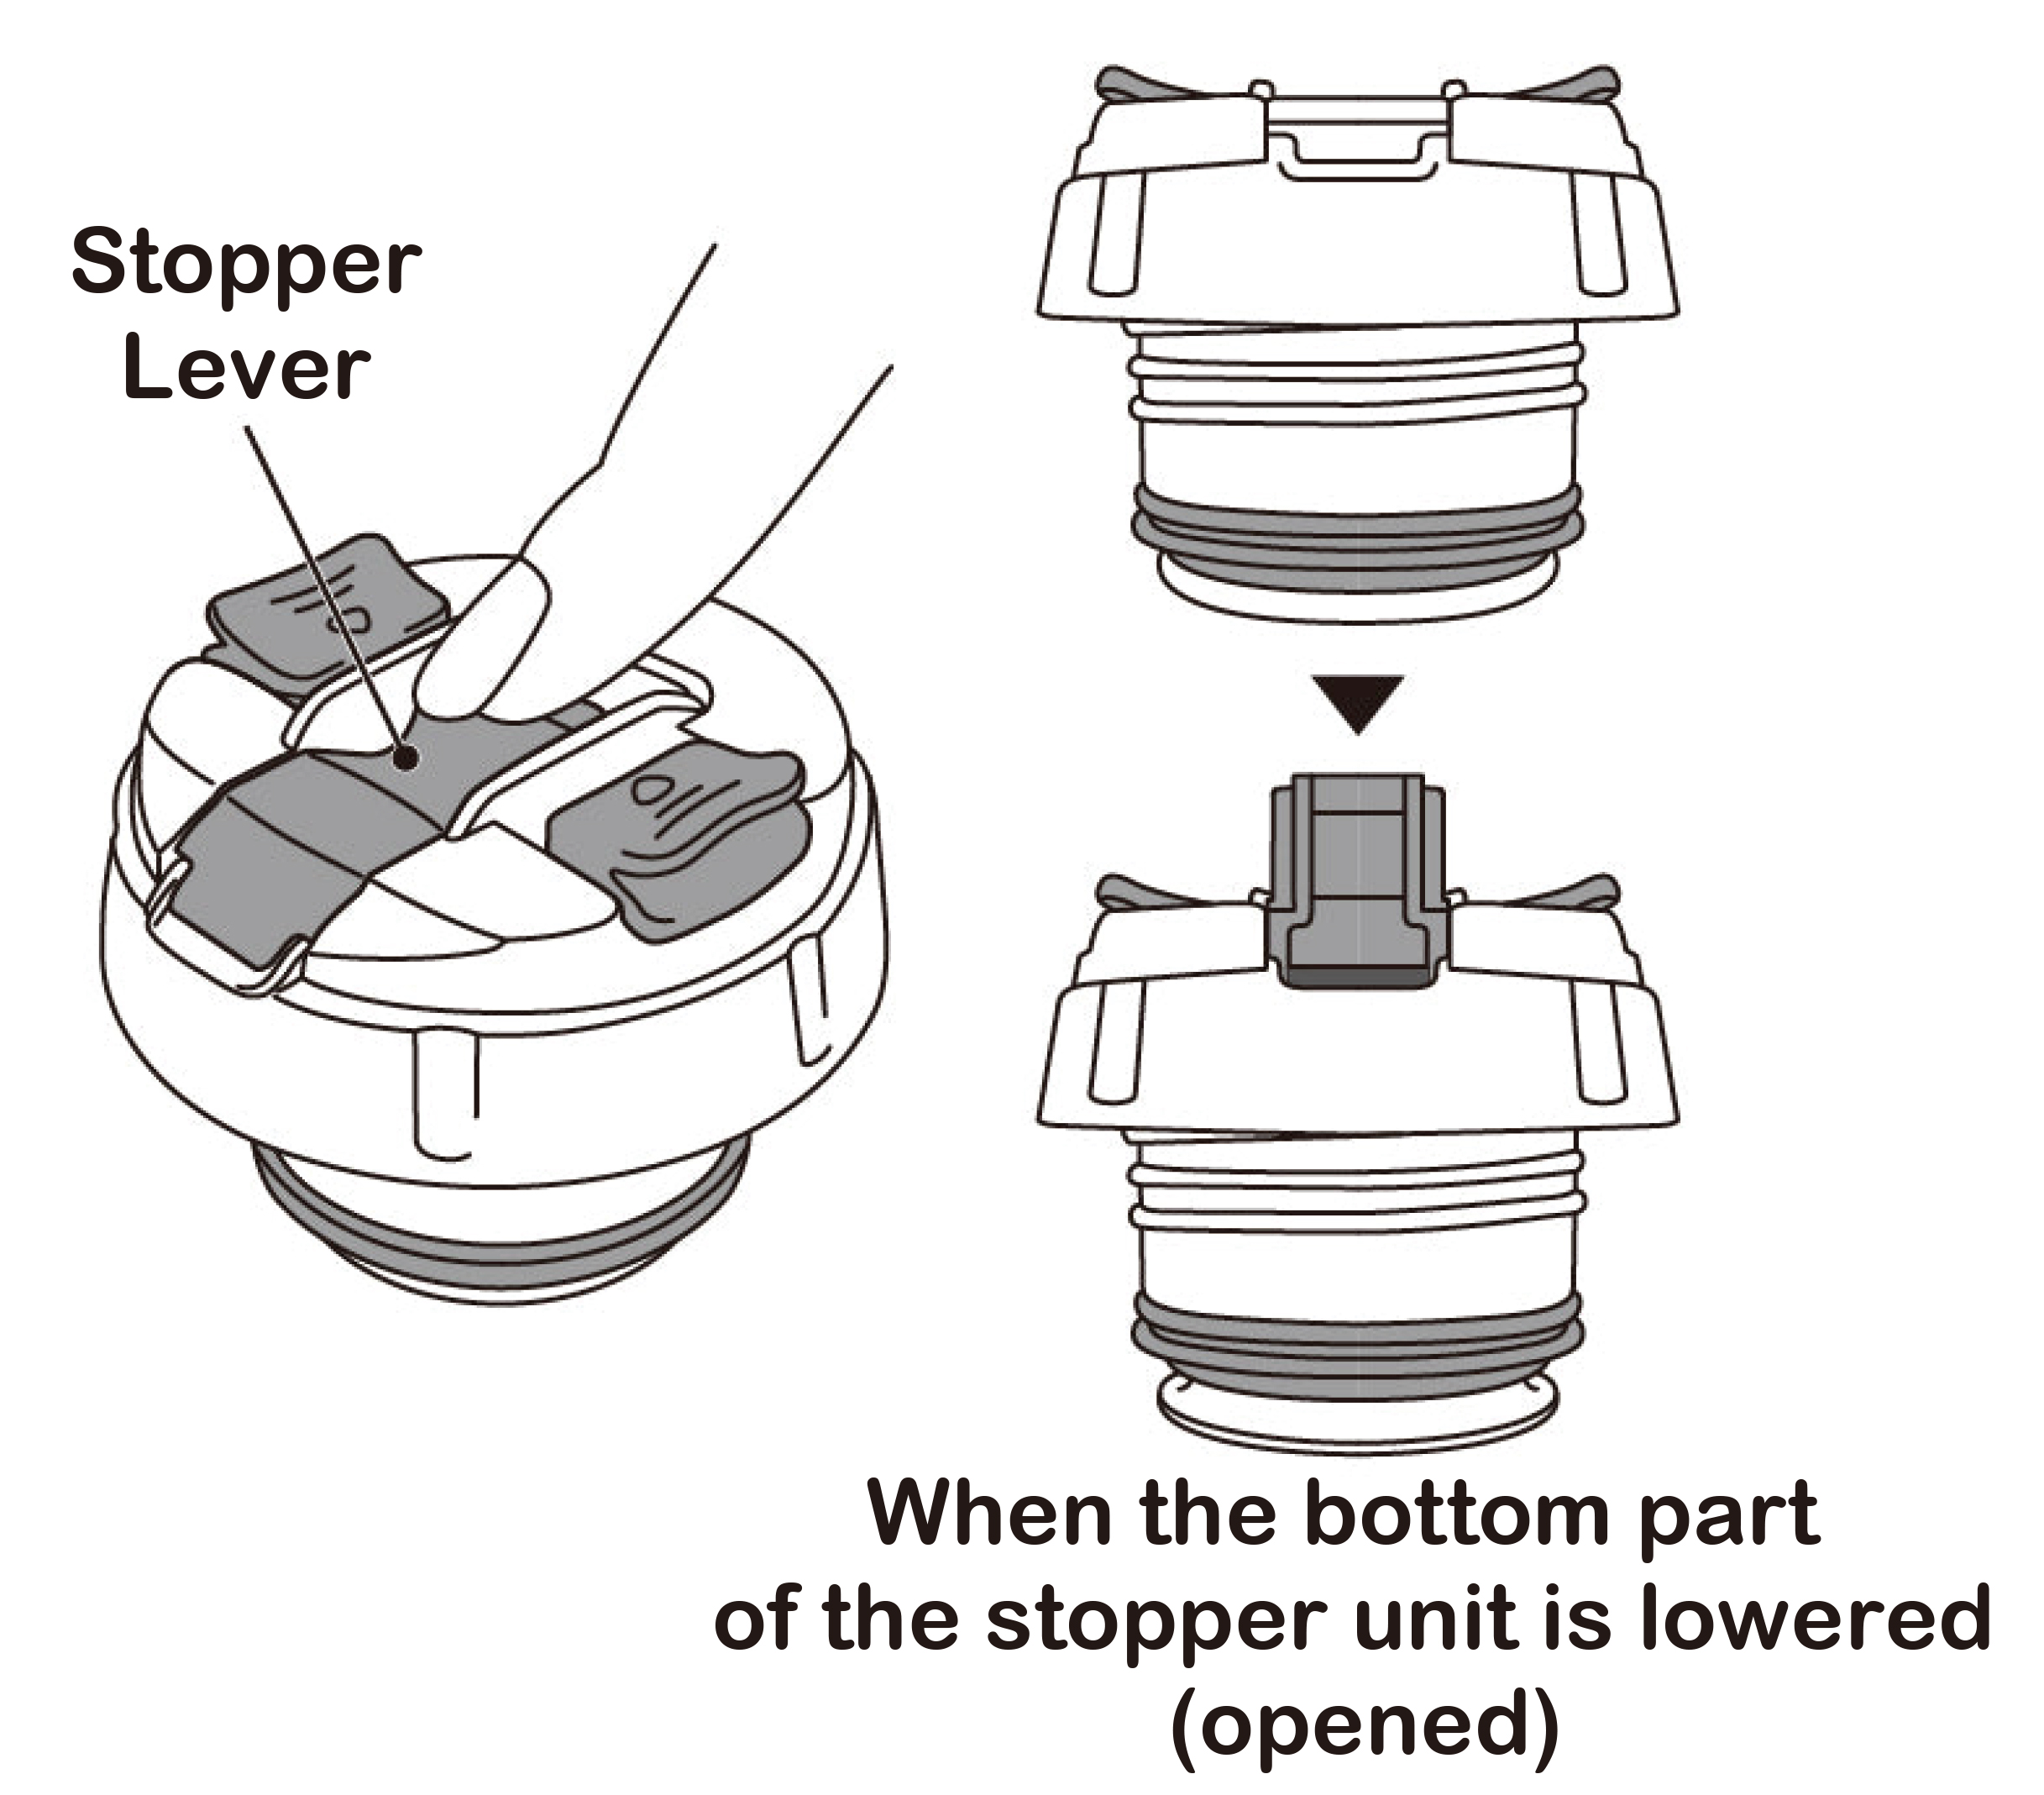
- Please place the seal in the correct direction when setting. Once fitted, press evenly with your fingers to make sure it is all the way in.
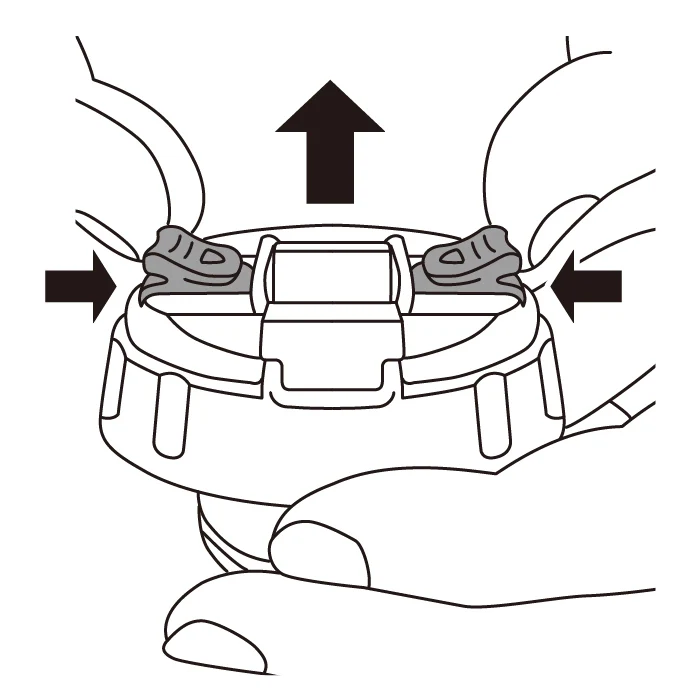
How to Disassemble Stopper Unit
Pull the Stopper Cap up while pushing both tabs inwards.
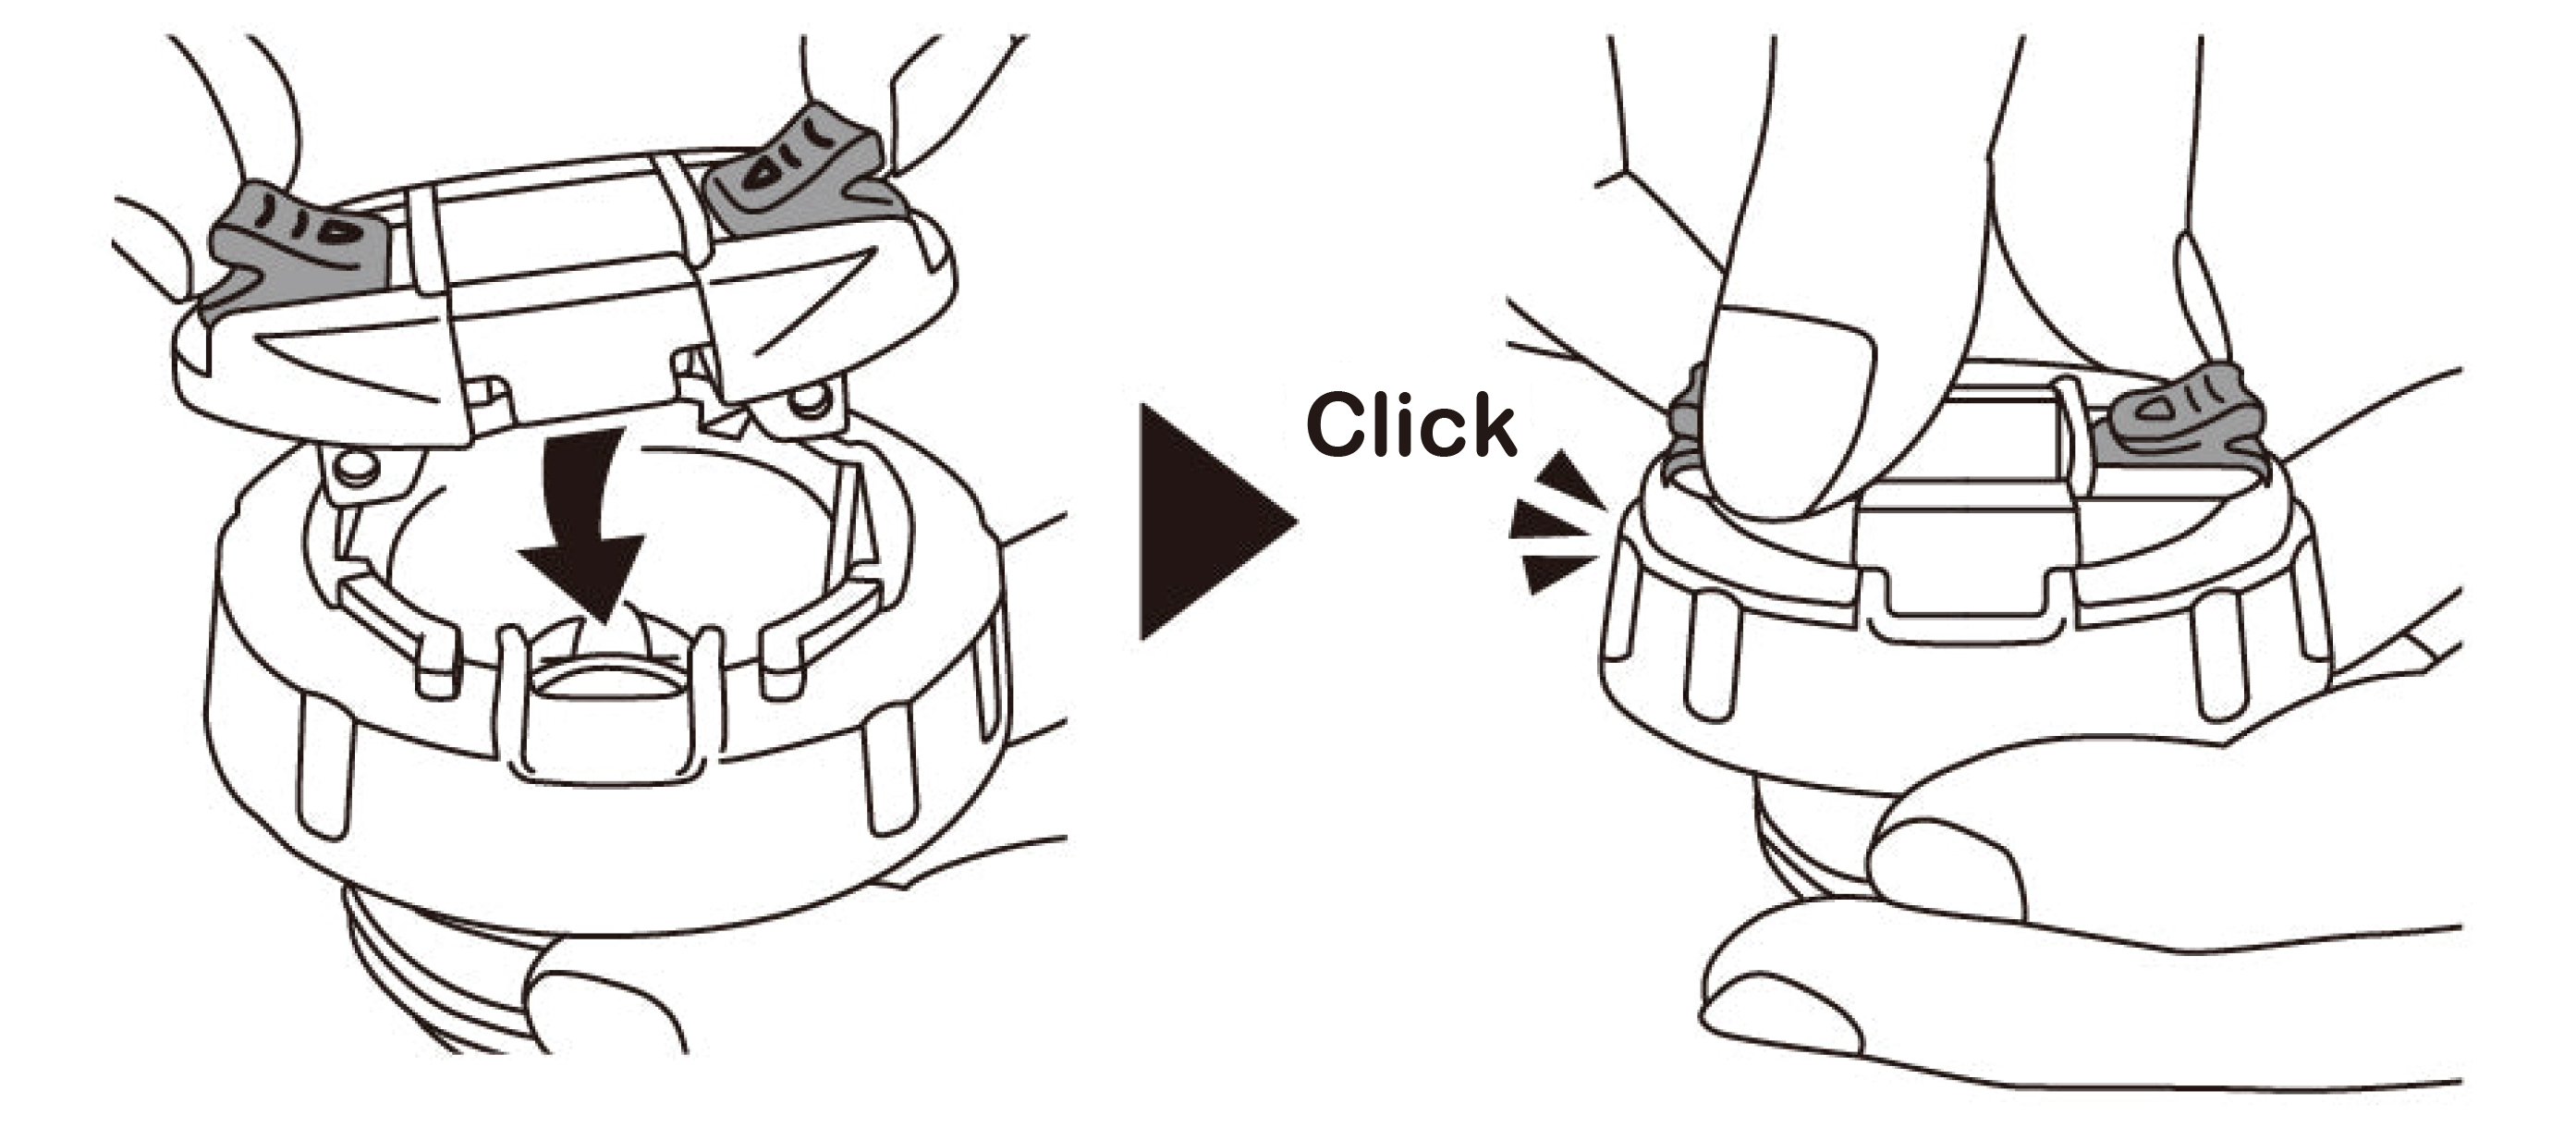
How to Set the Stopper Unit
Align the Stopper with the Spout of the Stopper Cap, and firmly push in the Stopper Cap until you hear a click.
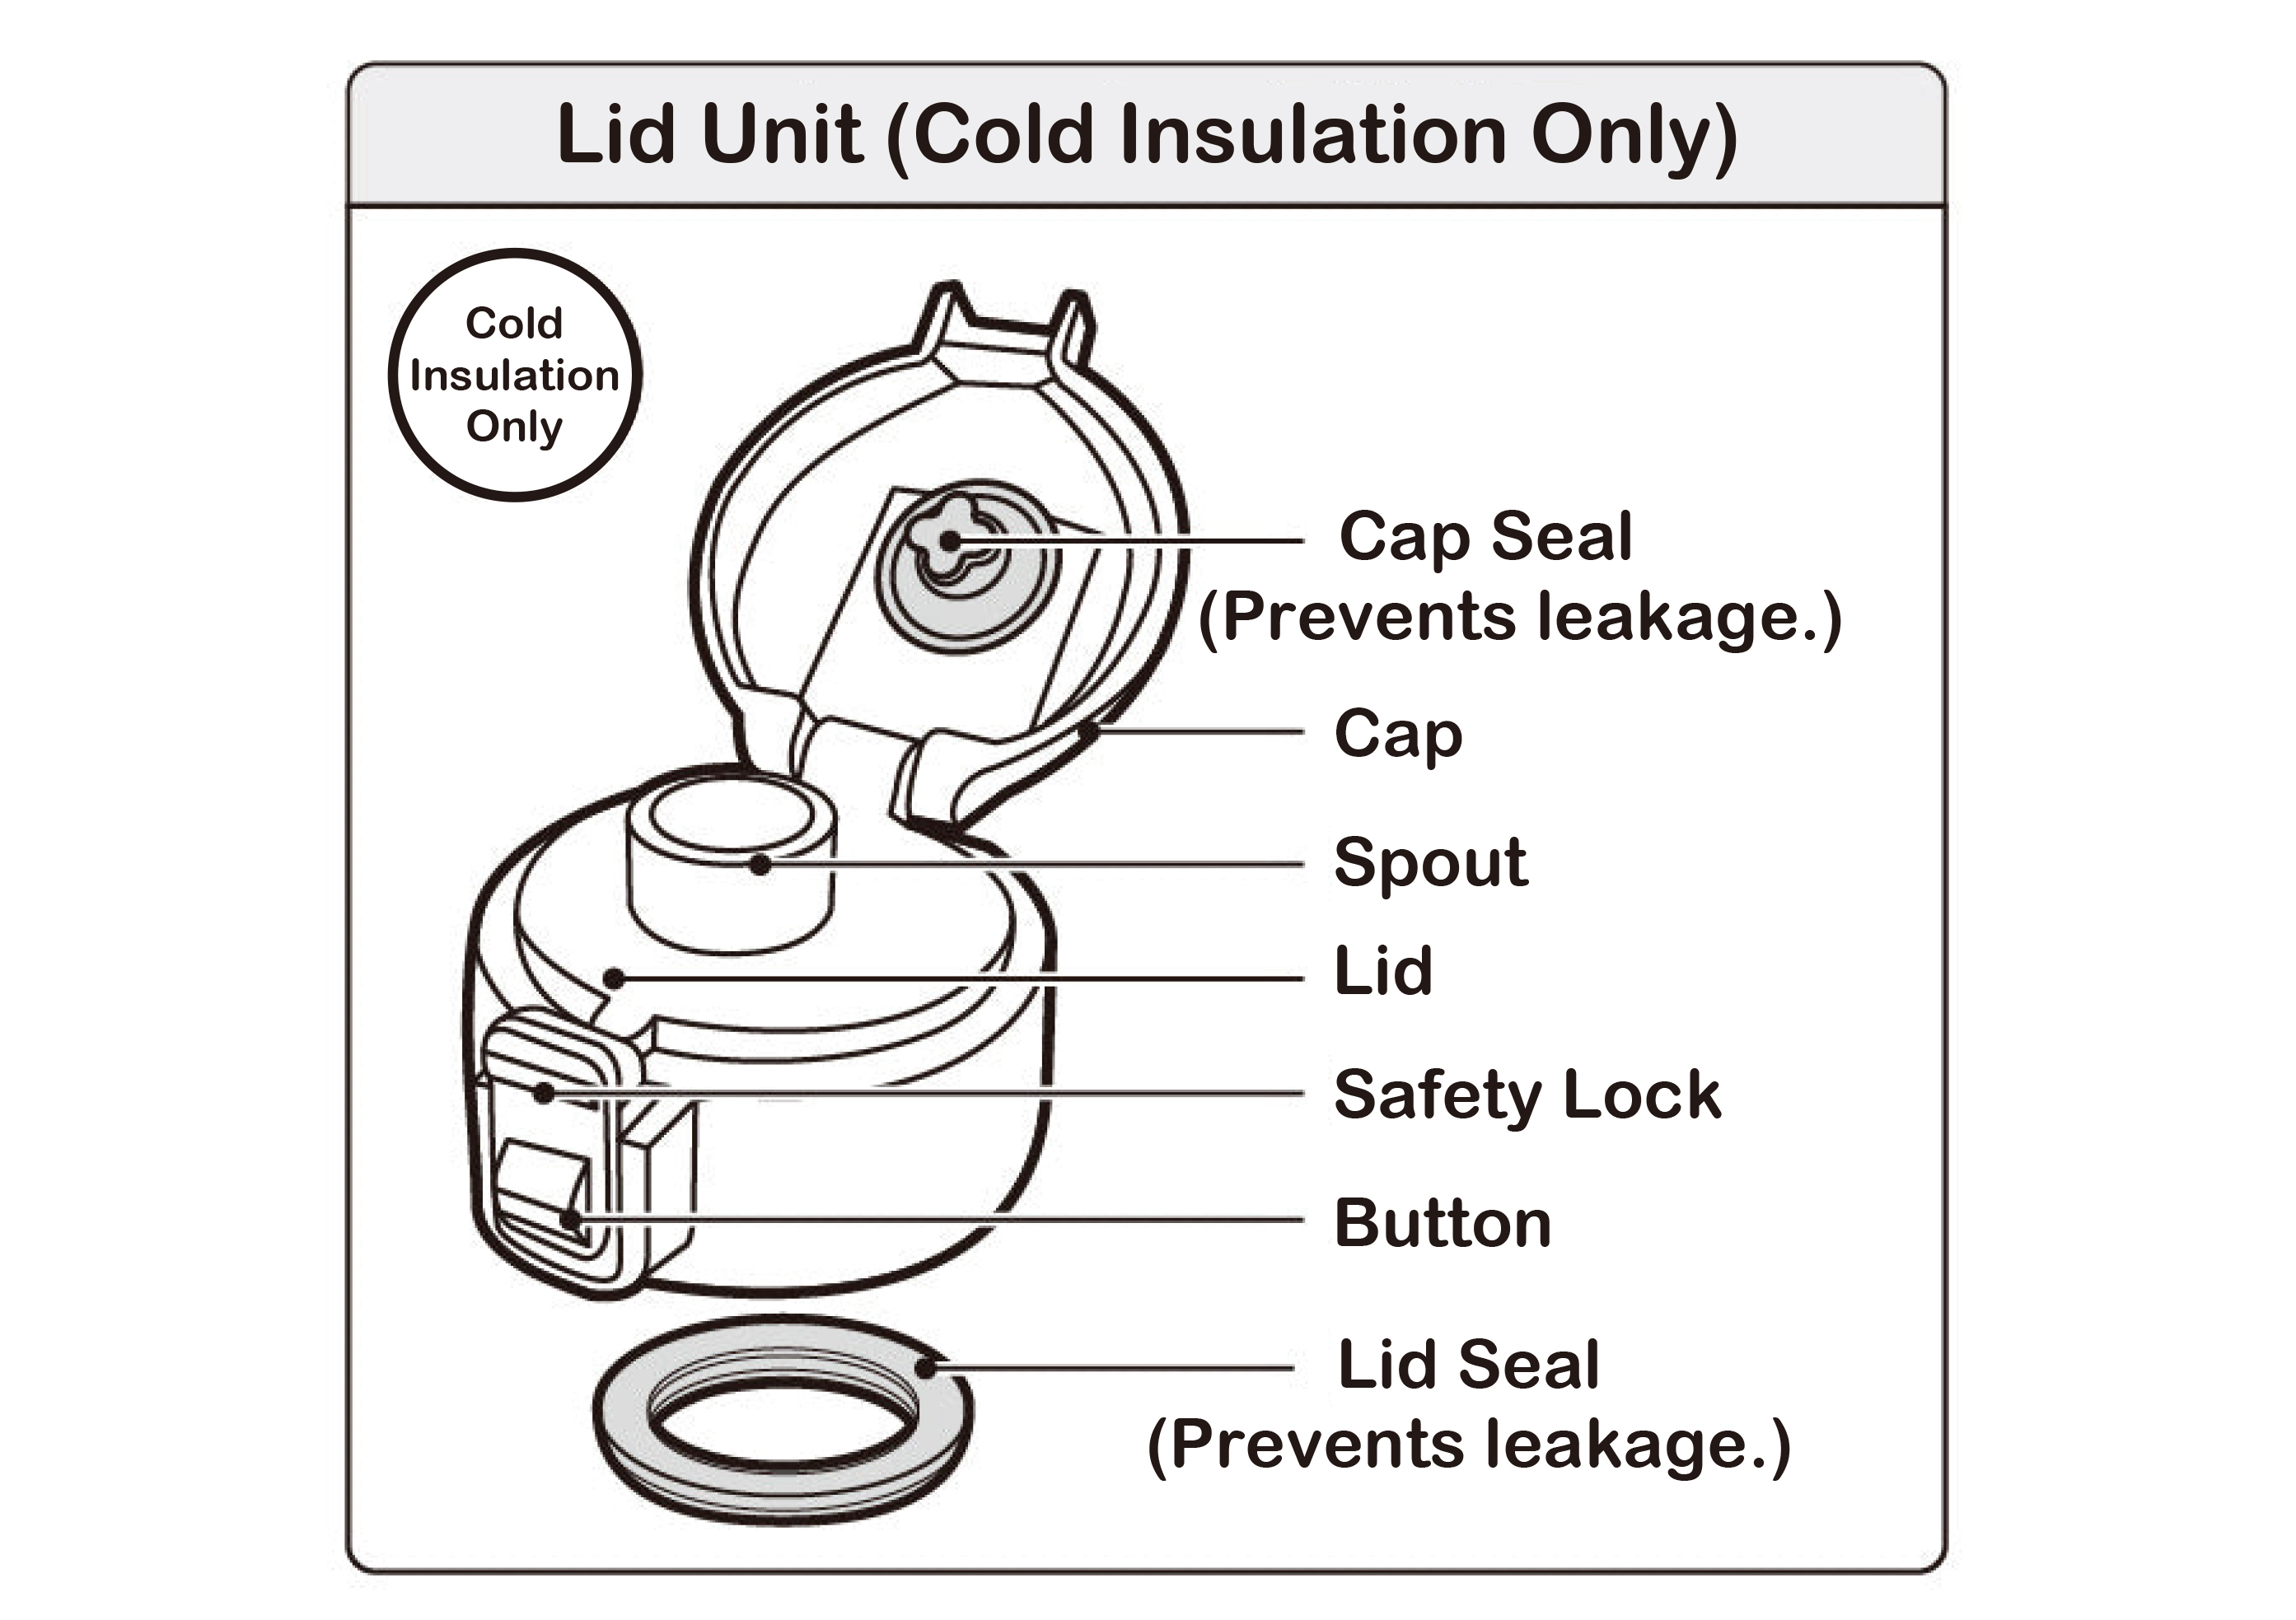
[Cold Insulation Only] Drinking Directly (Lid Unit)
How to Use Product
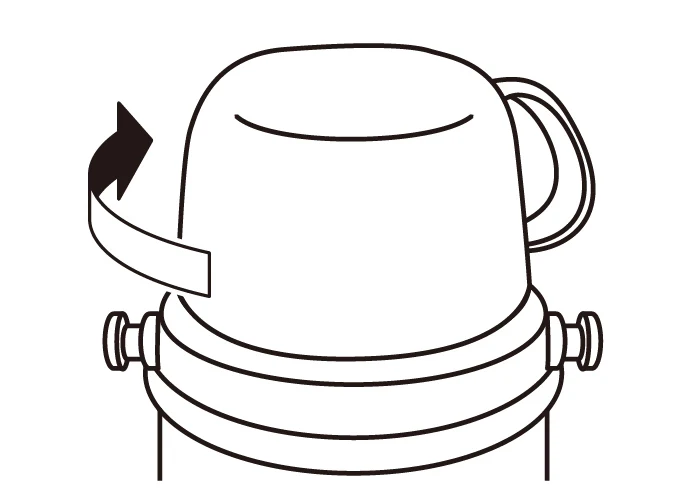
①Remove Lid Unit
Twist in direction of arrow to remove.
②Fill with Beverage
Only fill the bottle to the line shown in the diagram.
Filling above this line may cause overflowing.
POINT
Add a small amount of cold water in advance and pre-cool for about 1 minute to improve the cold insulation effect.
③Close Lid Unit
While the bottle is upright, twist the Lid Unit in the direction of the arrow to firmly close.
*Please turn the bottle upside down to ensure there is no leakage.
Warning
Do not tilt or shake the bottle while closing the Lid Unit.
④Drink Beverage
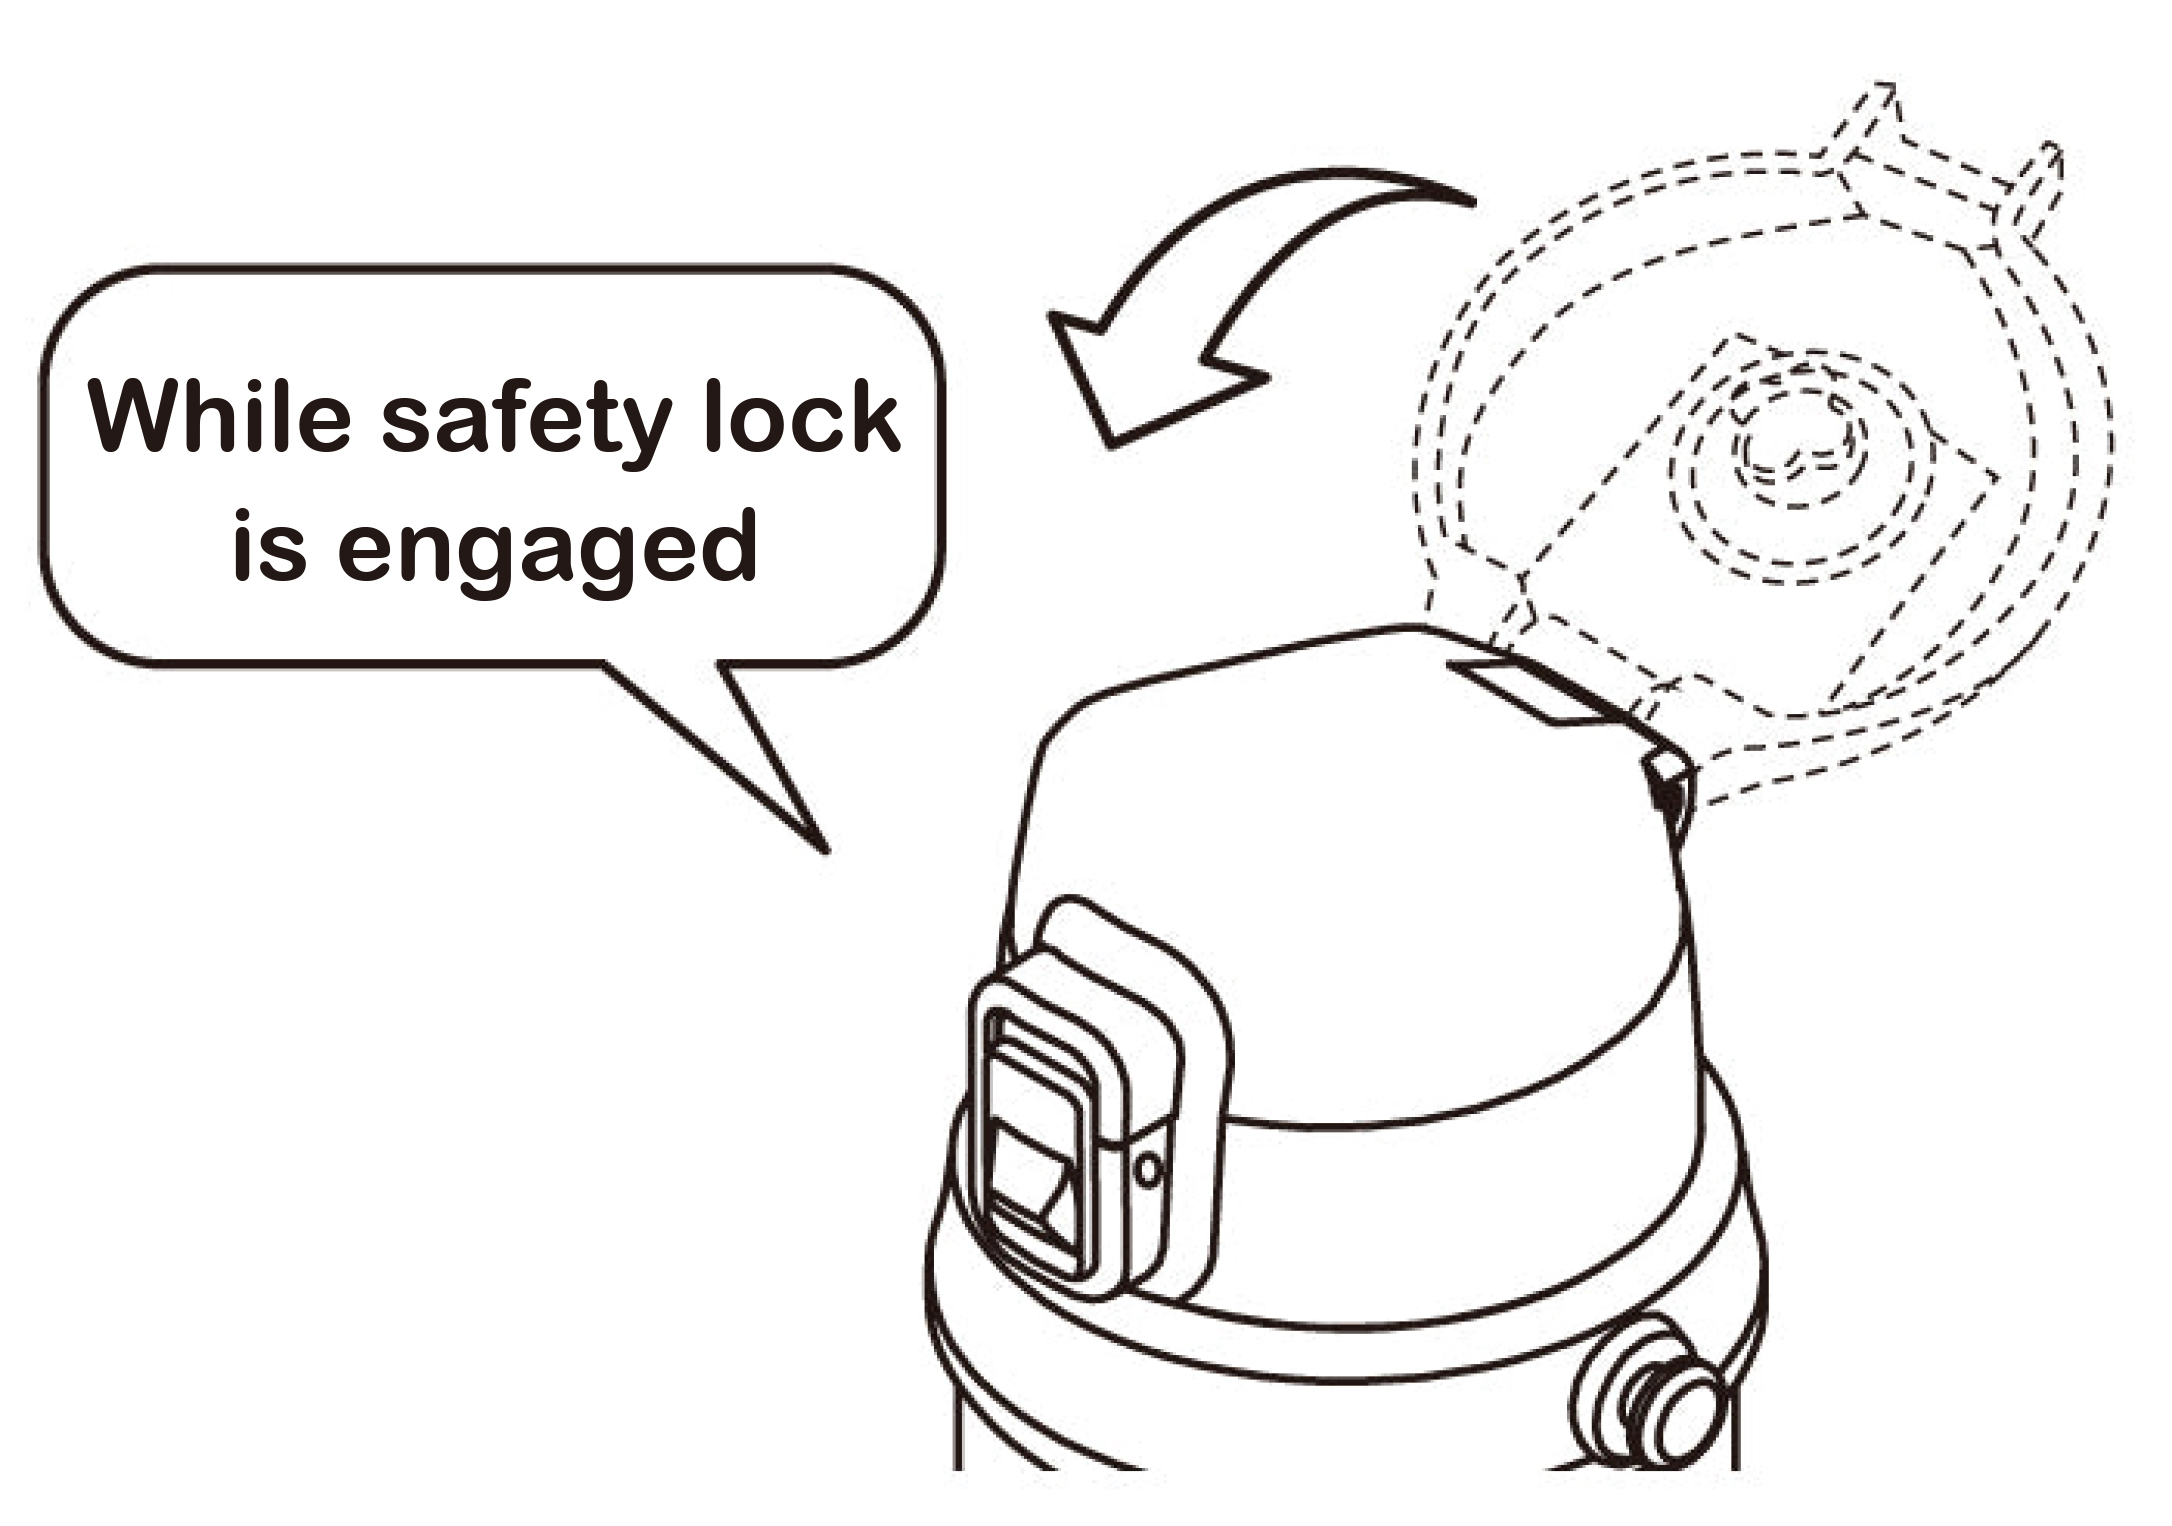
- Raise Safety Lock in the direction of the arrow to release.
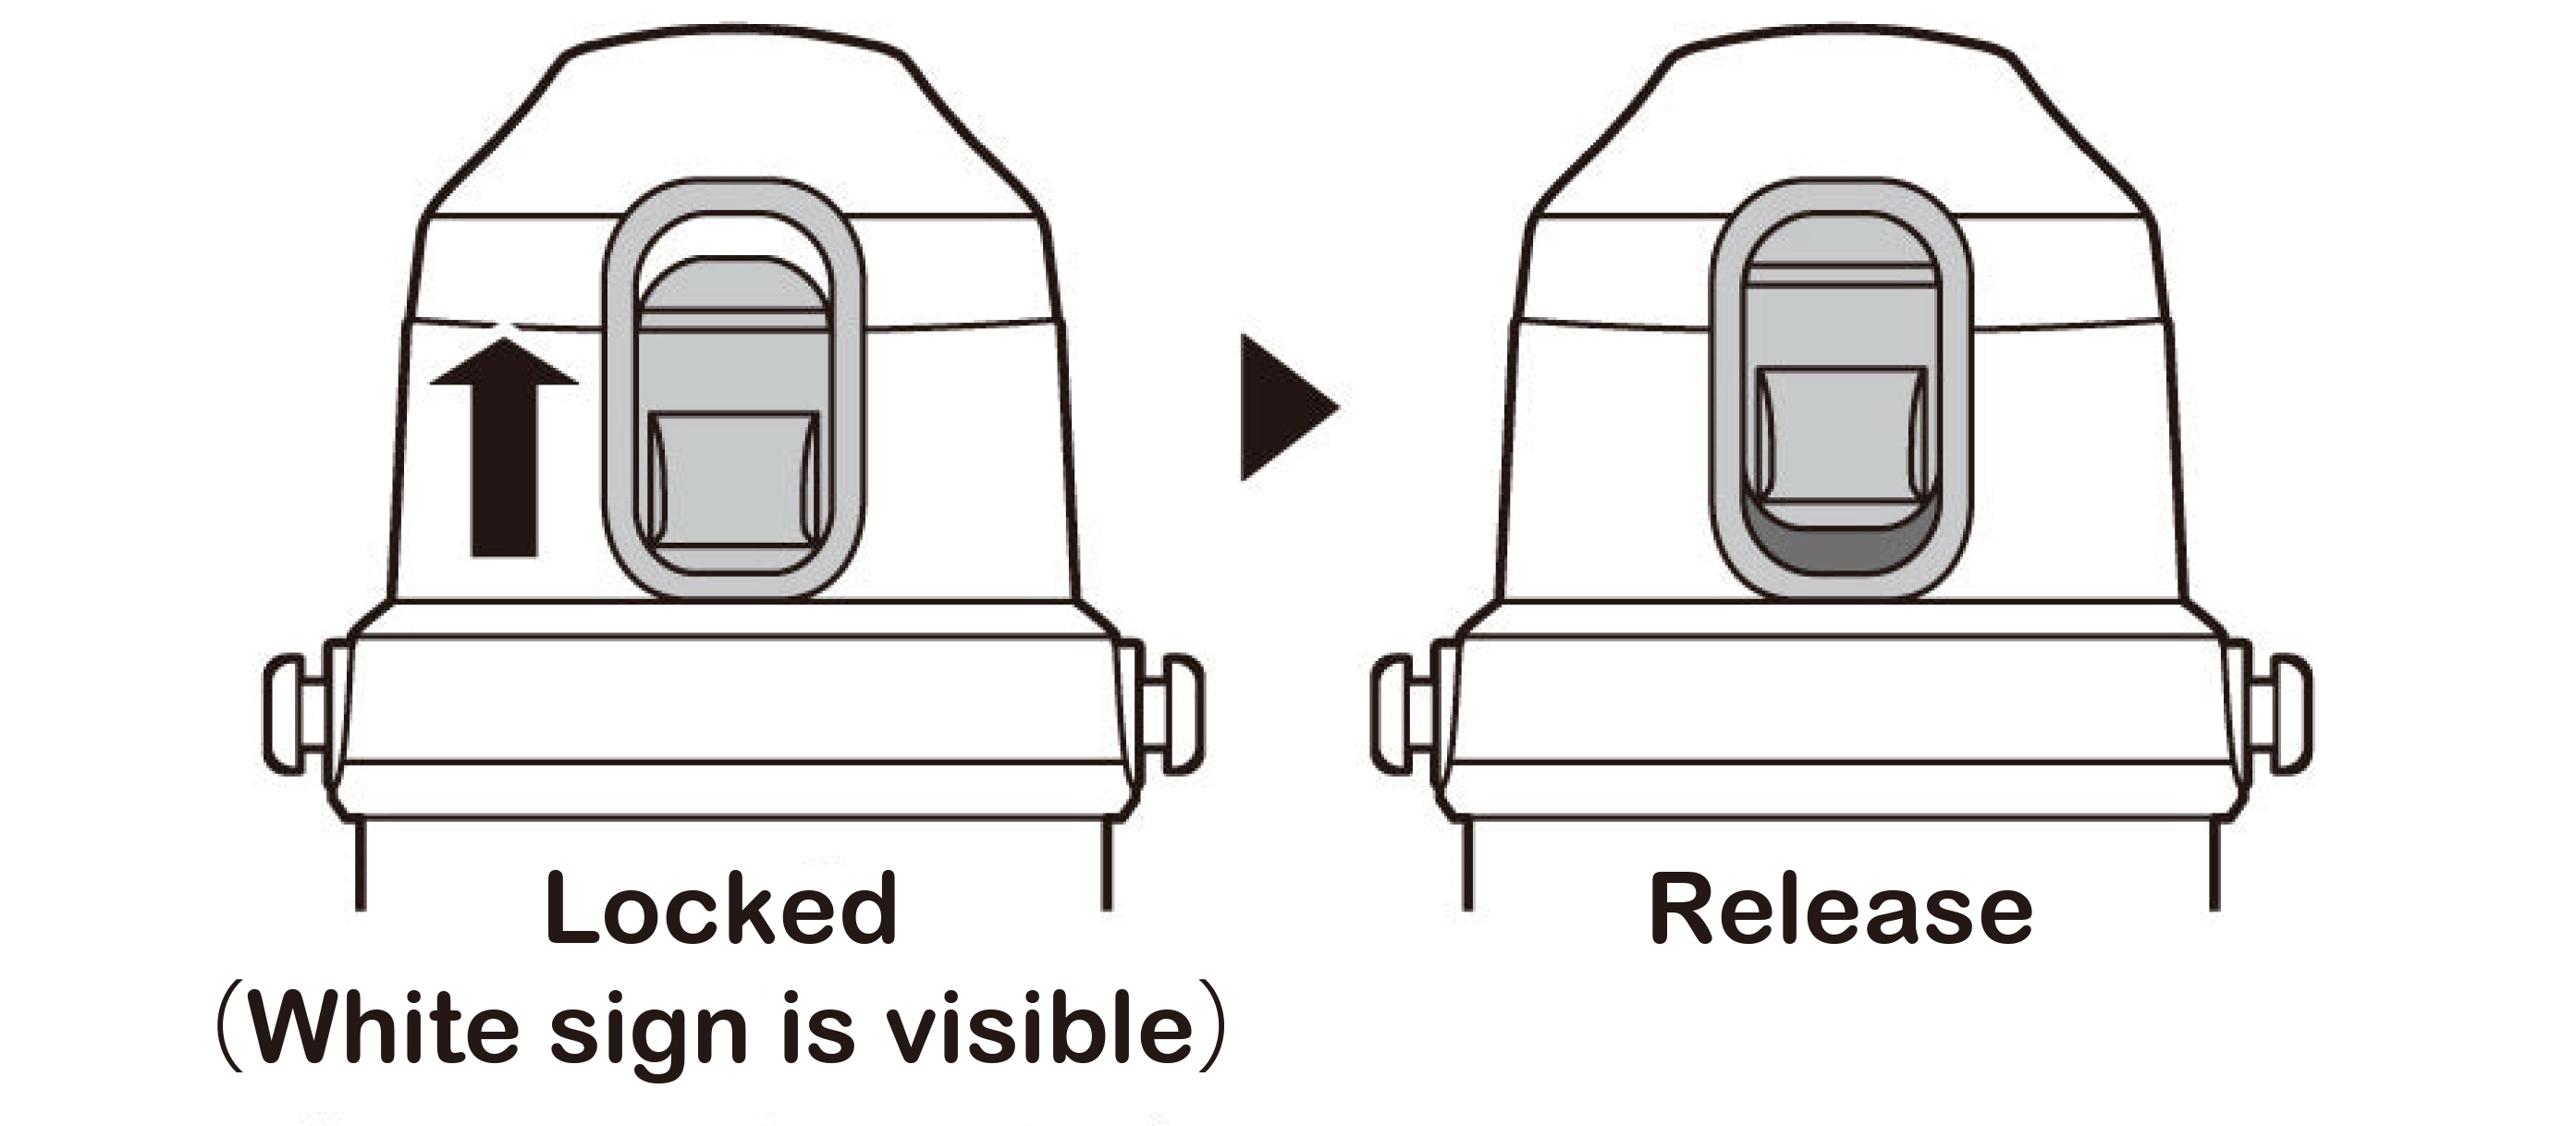
- Press Button to open the Cap.
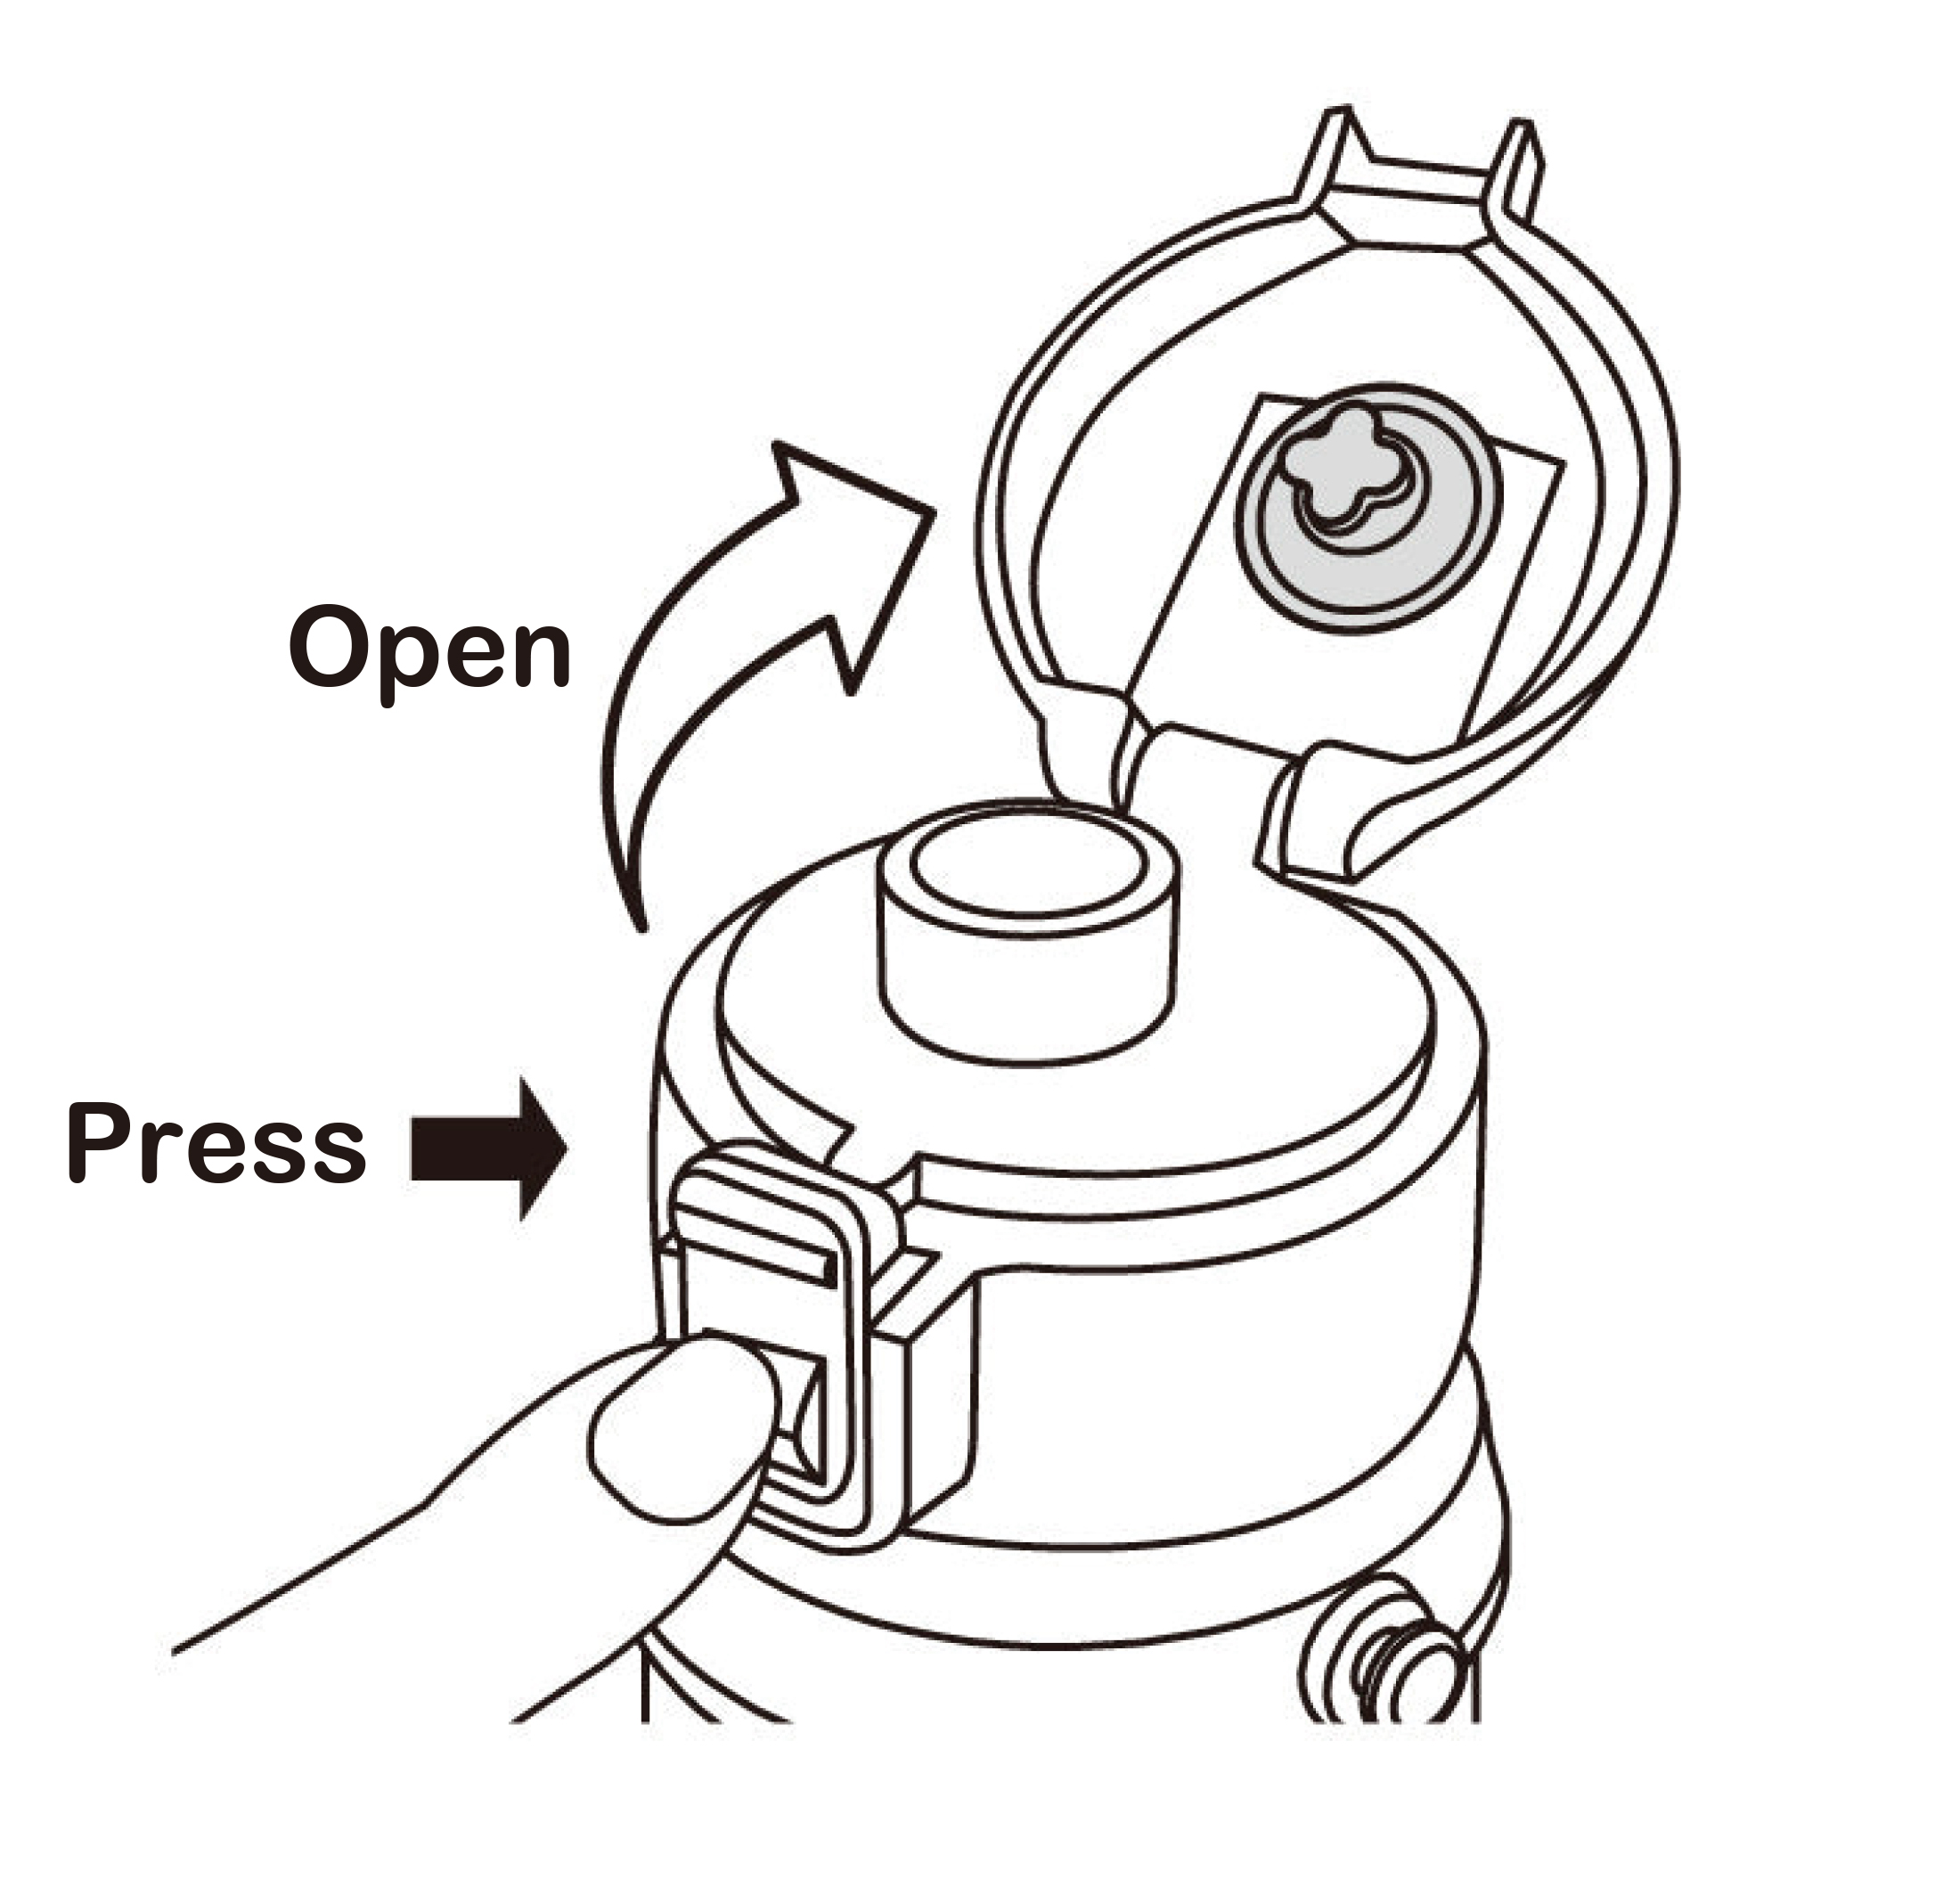
Bring Spout to your mouth and slowly tilt upward to drink.
Warning
Do not tilt or shake the bottle while opening the Cap.
This may cause leakage that leads to stains.
⑤Close
Hold the bottle upright and close the Cap until you hear a click.
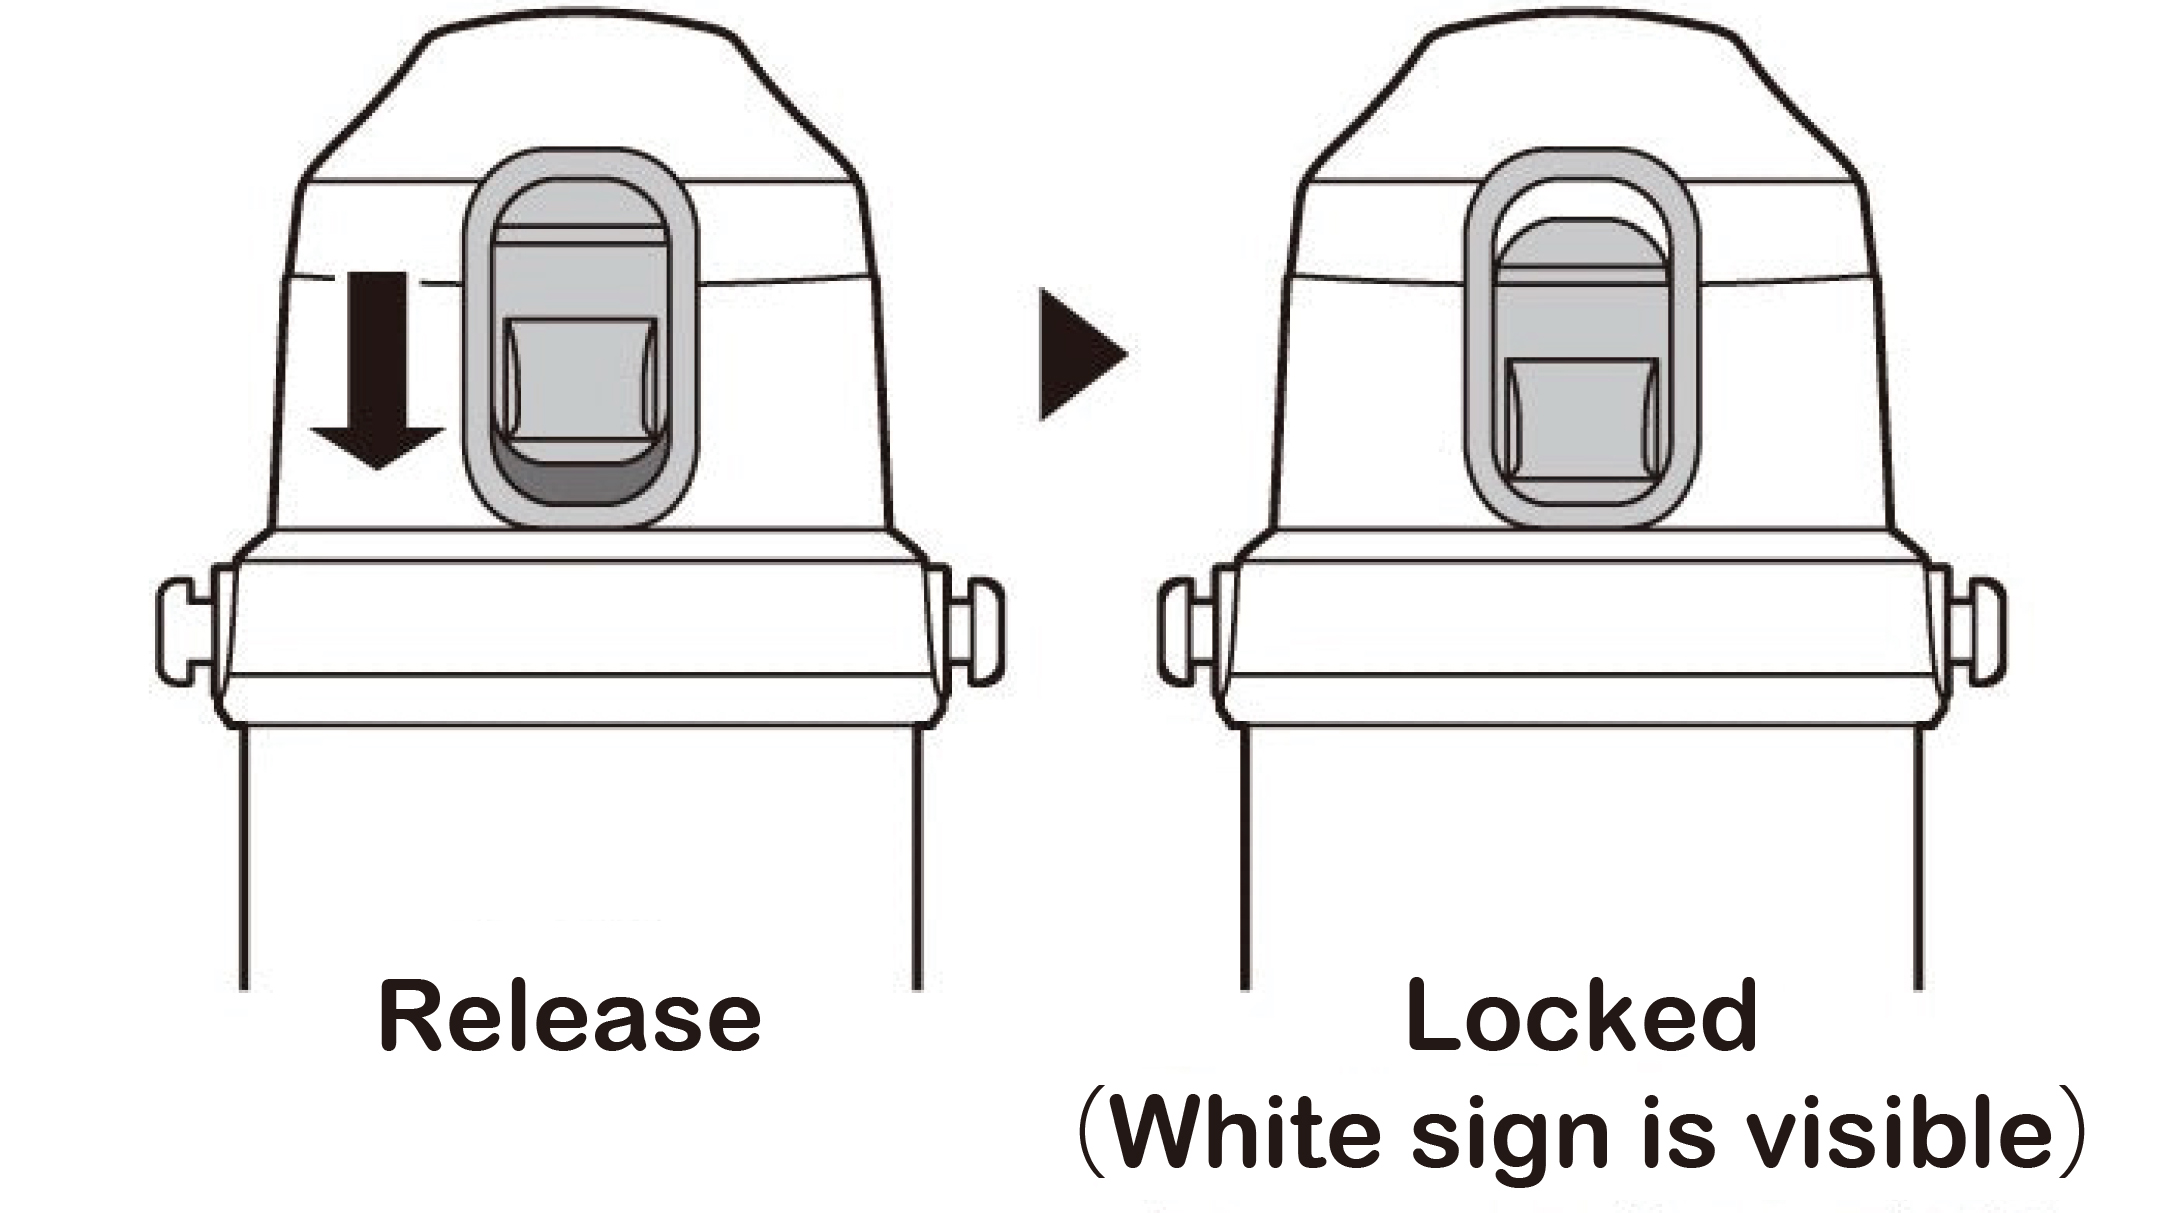
Lower Safety Lock in the direction of the arrow to lock.
Warning
Do not leave the Cap open.
This may cause the bottle to tip and spill your beverage, causing stains.
*The Cap will not close while the Safety Lock is lowered.
Please raise the Safety Lock before closing the Cap.
How to Remove and Set the Seal
①Cap Seal
When removing the Seal, pinch the protruding part of the Seal with your fingers for easy removal.
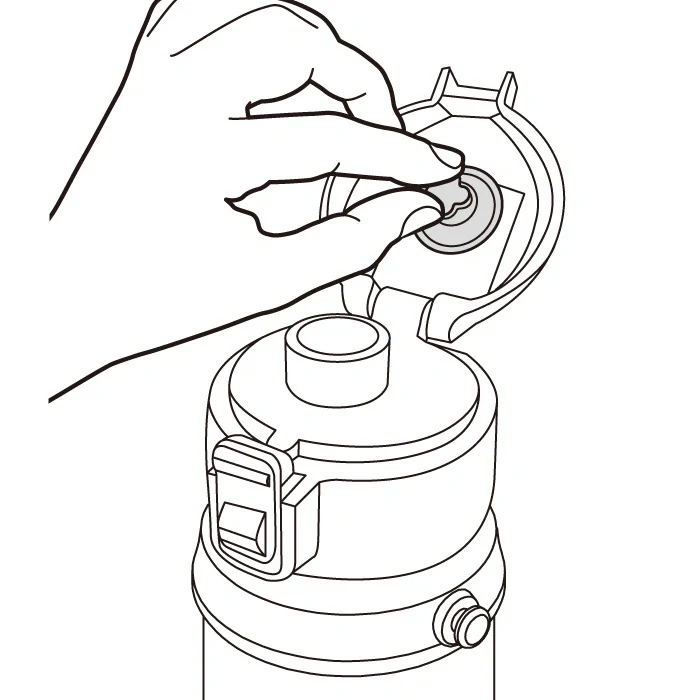
When setting the Seal, press the concave part of the Seal into the convex part of the Cap, and press evenly with your fingers to make sure it is all the way in. Please make sure the edges do not get caught.
②Lid Seal
When removing the Seal, pinch the guide part of the Seal with your fingers for easy removal.
Please place the seal in the correct direction when setting. Once fitted, press evenly with your fingers to make sure it is all the way in.
Warnings for Usage
Caution
- Please keep out of reach of children. This product is not a toy, do not let children play with it. This is dangerous and may cause burns or injuries.
- Please use under the supervision of a parent or guardian when small children are using this product.
- Only place the shoulder strap on the shoulder, never around the neck. Do not play or exercise while using the shoulder strap. This may cause suffocation and is extremely dangerous.
- Drinking directly from the bottle (Lid Unit) is for cold beverages only. Do not fill with a hot beverage.
Warning
- Do not use for any other purpose than keeping beverages.
- Do not wear the product bag over your face.
- Do not clean in dishwashers or dish dryers.
- When pouring hot beverages, please be careful not to tip the bottle over or get burned. Do not let hot kettles, etc. directly touch the bottle.
- Do not place near the stove or fires. This will cause deterioration and discoloration.
- When using the Stopper Unit with Cup, always use the Cup rather than directly drinking from the bottle, especially if it contains a hot beverage. The beverage may pour out quickly and cause burns.
- Do not use the strap to throw or fling the product around.
- Please make sure that the seal is set correctly and that the Stopper Unit and Spout Unit are securely closed. Failure to do so may cause leakage, etc.
- Only fill the bottle to the line shown in the diagram. Filling above this line may cause leaks or overflowing.
- Do not put in any of the following things.
- Dry ice・Carbonated Beverages
This is dangerous as these may increase the pressure, causing the Stopper Unit or Lid Unit to not open, the contents to blow out, or the parts to burst. - Milk・Dairy-based Drinks・Fruit Juice Perishable Items
- Sodium-rich liquids such as miso soup, soup, etc.
Though the inner bottle is made of stainless steel, these may still cause rusting. - Tea Leaves・Fruit Bits
These may cause clogging, leaking, etc.
- Dry ice・Carbonated Beverages
- If filling the product with a sports drink, wash immediately after use to prevent spoiling and rusting. If there is already internal damage to the product, do not fill it with sports drinks.
- Instead of forcing in large pieces of ice that may cause scratches and leaks, please make them smaller first.
- Do not tilt or shake the bottle while closing the Stopper Unit or Lid Unit. This may cause the beverage to spill, causing burns or stains.
- Please note that water droplets (condensation) may form on the Stopper Unit or Lid Unit when the bottle is filled with cold beverages or during high humidity.
- Strong smells may transfer to the product. This is not harmful.
- Do not carry by Cup, Stopper Unit, or Lid Unit.
- If carrying in a bag, etc. place it in vertically to avoid leaks.
- Do not refrigerate.
- Do not microwave.
- Do not drop, hit or subject this product to strong impact. This may cause dents or decrease its insulation capability.
- Do not keep contents inside for long periods of time. This may cause spoiling.
- Do not leave in a hot area such as a car for extended periods of time.
- Do not carry with electronic equipment, such as laptops and cameras. In the unlikely event that the beverage leaks, this may cause damage to electronics.
- Do not use while driving or riding a car or bicycle.
- Do not modify, disassemble, or repair the product. This is dangerous and may cause malfunctions or accidents.
- Do not remove the production lot sticker attached to the bottom of the product.
How to Maintain Product
- Wash thoroughly and dry completely after each use.
- Apply mild dish soap to a sponge or soft cloth, wash with lukewarm water and dry completely.
- For stubborn grime, please use oxygen bleach (approximately 30 minutes) according to the [How to Care for Each Part] instructions below.
- If you will not be using the product for a long time, wash and dry it thoroughly, and store in a dry, cool place.
[How to Care for Each Part]
Cup・Stopper Unit・Lid Unit
How to Wash
- ⚪︎ Rinse
- ⚪︎ Soak and wash
- ⚪︎ Oxygen bleach
- × Chlorine bleach
How to Maintain
Remove Cup・Stopper Unit・Lid Unit・Seal from bottle, then wash each component thoroughly and dry completely.
After cleaning, set the Seal back in its correct position.
Inner Bottle
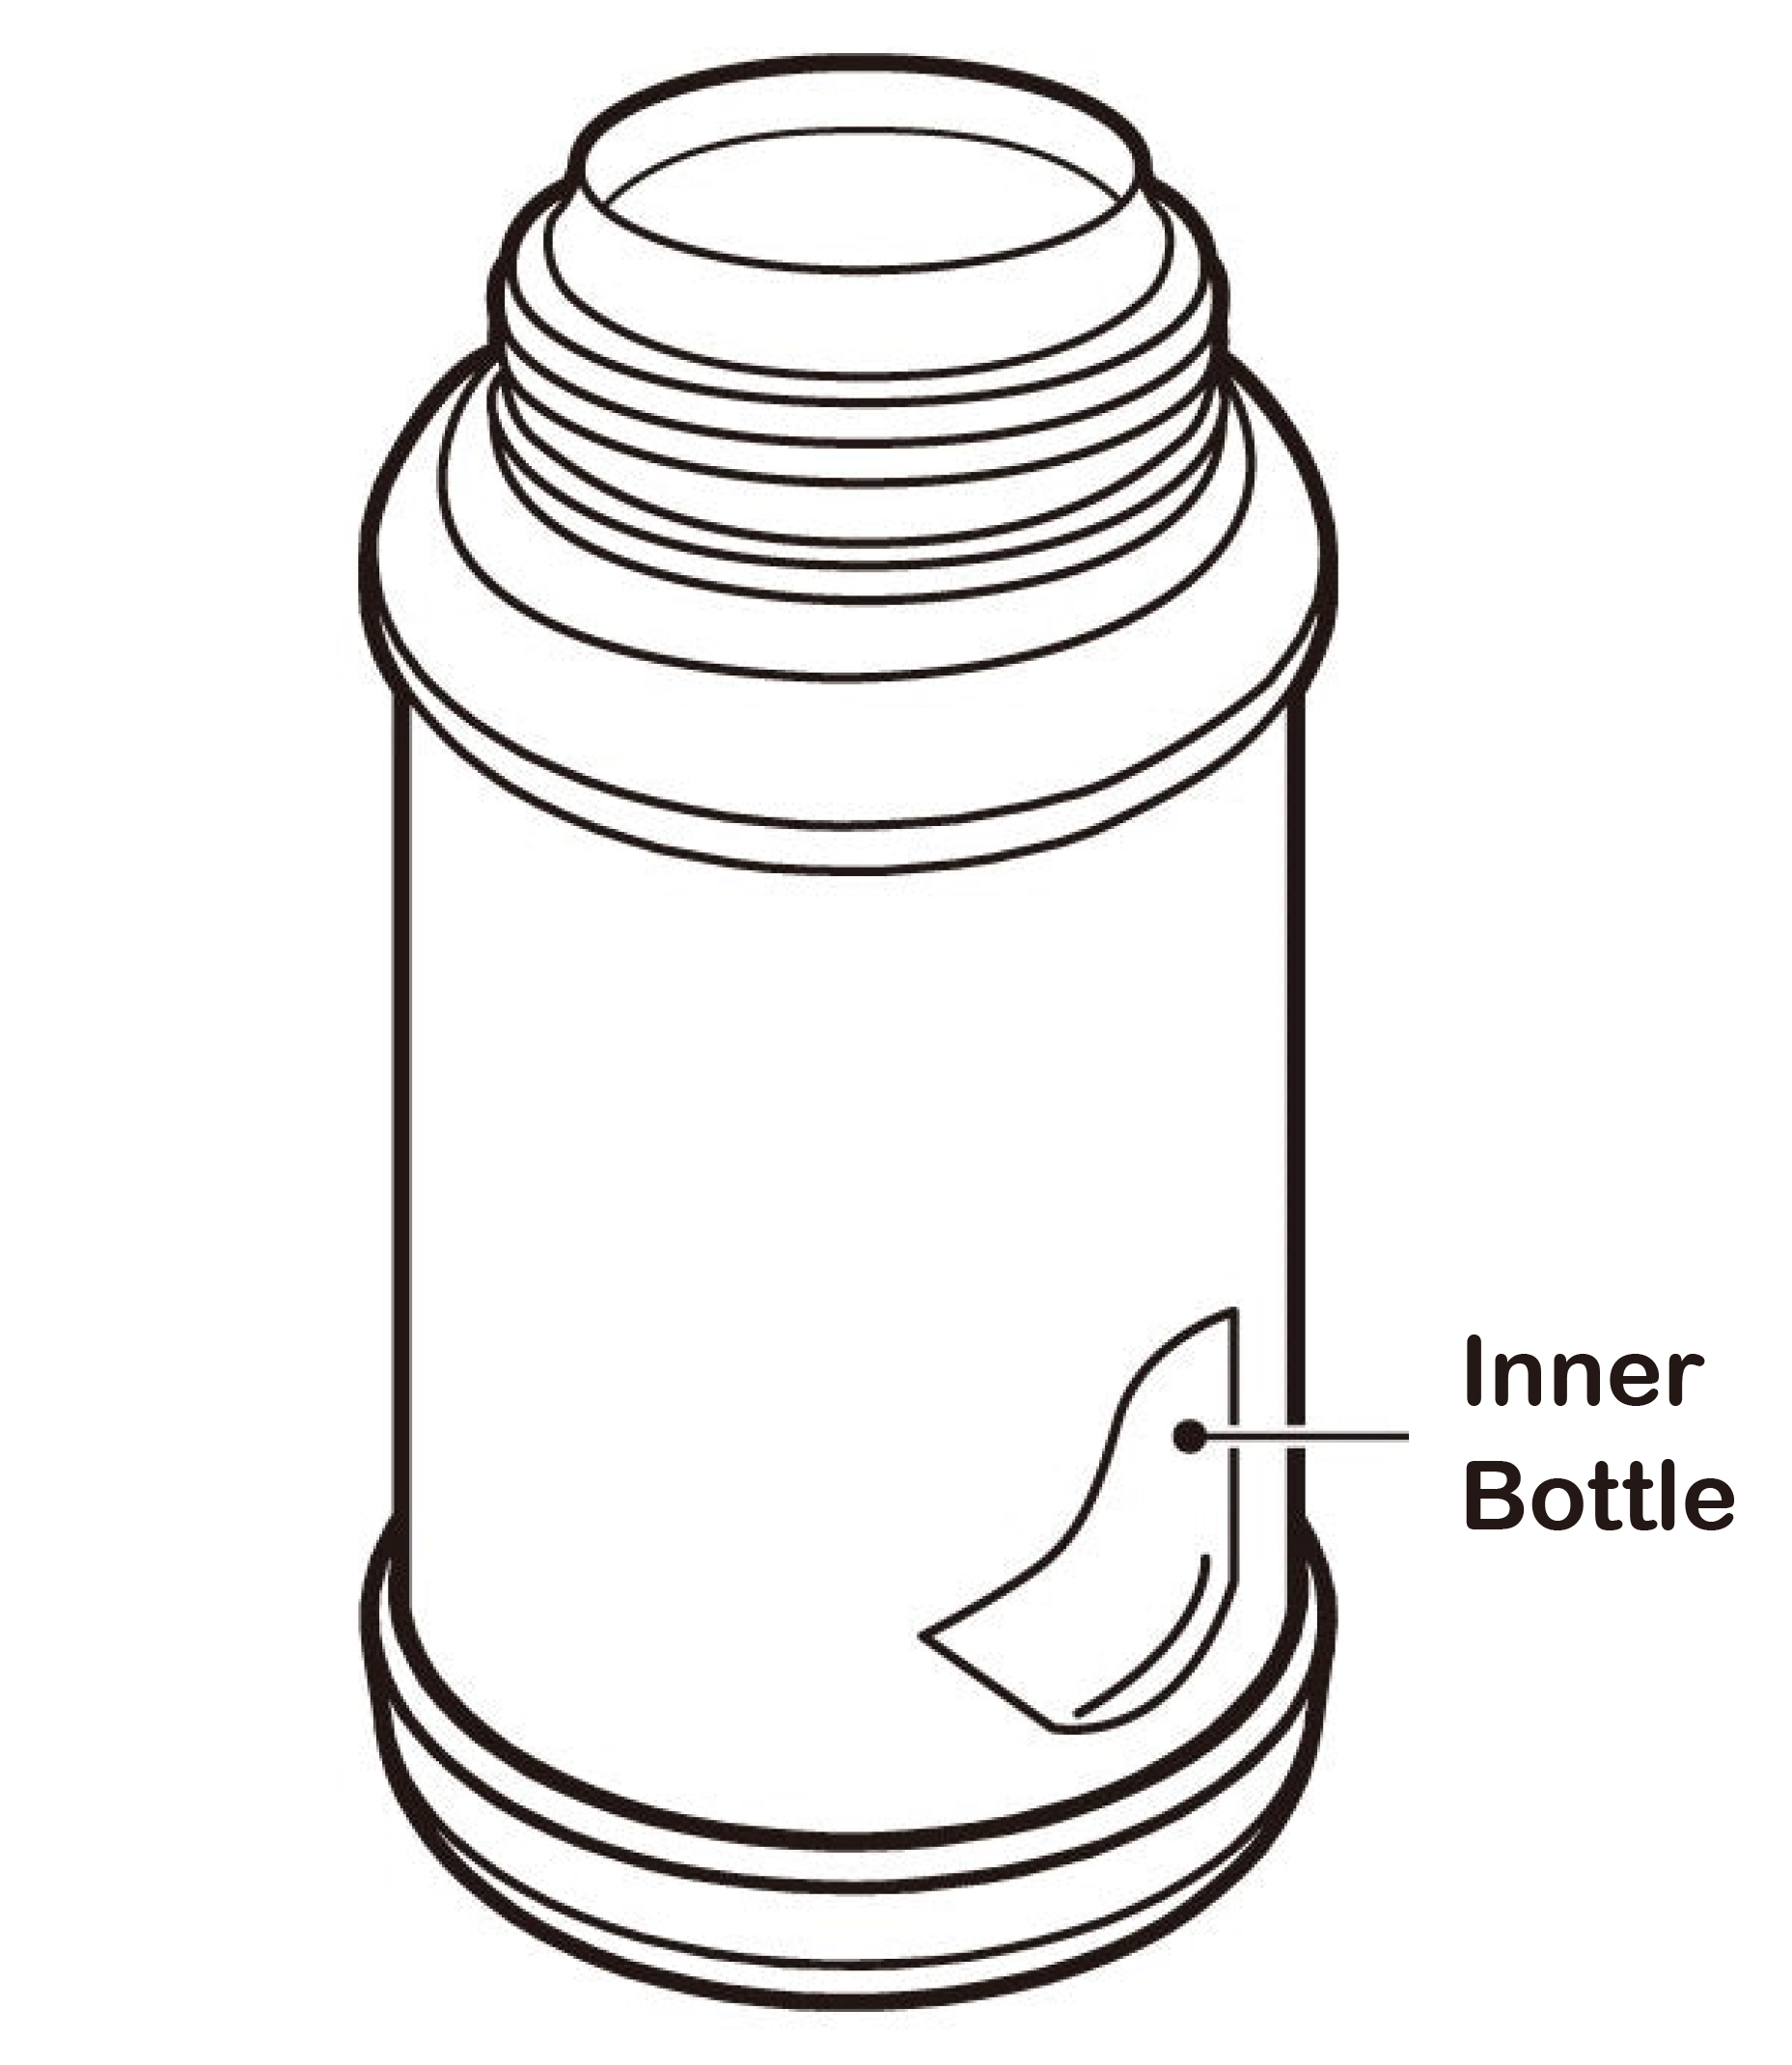
How to Wash
- ⚪︎ Rinse
- ⚪︎ Soak and wash
- ⚪︎ Oxygen bleach
- × Chlorine bleach
How to Maintain
Clean thoroughly with bottle brush or sponge, then rinse thoroughly and dry completely. Although this product is made with stainless steel, red spots that look like rust may form due to water quality or impurities. If this occurs, leave a solution of hot water with approximately 10% vinegar in the bottle for about 30 minutes, clean the inside with a soft brush and rinse thoroughly.
* When using oxygen bleach, do not close the Stopper Unit or Lid Unit. This is dangerous as the internal pressure of the bottle will increase and may cause it to be damaged or burst.
Outer Bottle (Shoulder・Body・Base)
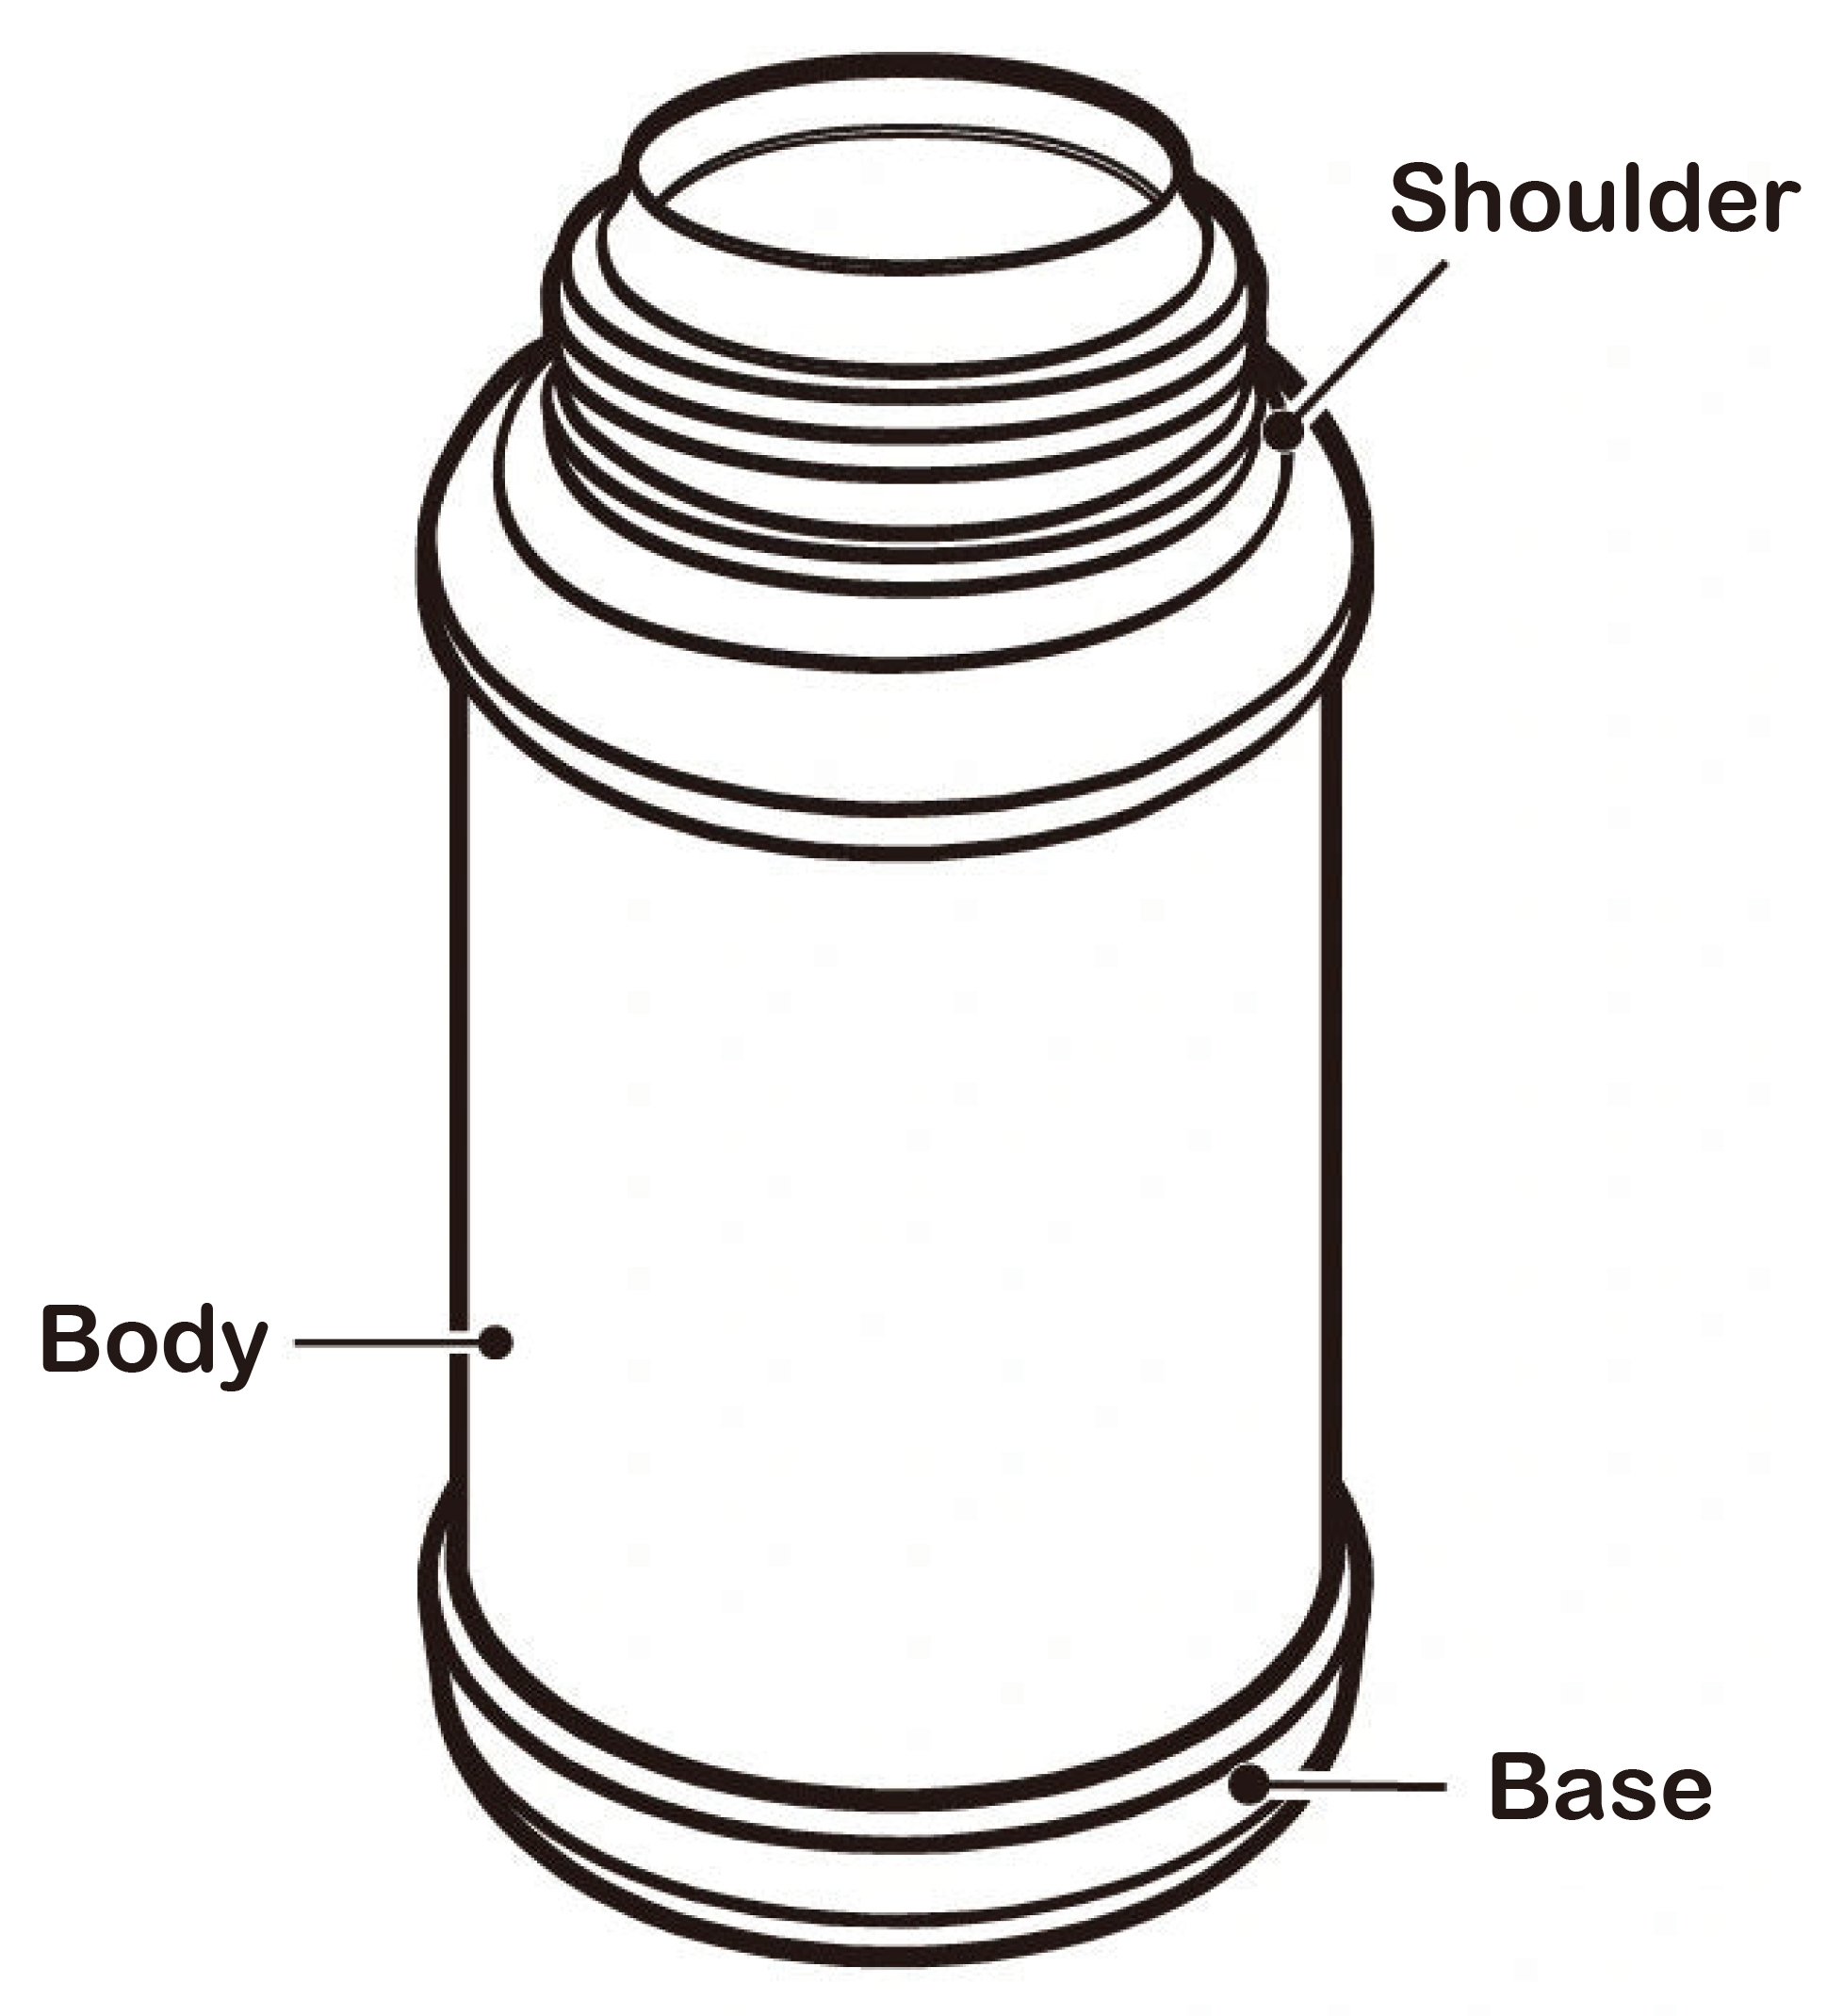
How to Wash
- ⚪︎ Rinse
- × Soak and wash
- × Oxygen bleach
- × Chlorine bleach
How to Maintain
Wash thoroughly, drain well, and wipe off any moisture immediately with a dry cloth and leave to dry completely.
* Do not leave the whole bottle soaking. This may decrease its insulation capability. (Inner bottle can be left soaking)
Warnings for Maintenance
- Do not boil this product. The heat will cause deterioration and leakage.
- Do not wash in dishwashers or dish dryers.
- Do not leave the whole bottle soaking. This may cause rust or decrease its insulation capability.
- Do not use chlorine bleach, thinner, benzene, metal scrubbers, polishing powder, or cleansers.
- Do not use bleach on the outside of the product. This may cause paint, prints, stickers, etc. to peel off.
Q&A
What if my beverage is leaking?
- Check if the Seal is set correctly, and that the Stopper Unit or Lid Unit are firmly closed.
- Check for overfilling.
- Check that the Stopper Unit, Lid Unit, or Seal are not damaged or worn out.
What if the interior has discolored?
- If there is stubborn grime, wash it thoroughly with a sponge soaked with dish detergent. If the grime does not come off, please use oxygen bleach (approximately 30 minutes).
Warning
Please carefully read the instructions for the oxygen bleach and use it correctly.
What if the insulation is not working?
- Please check whether your beverage is warm (or cold) enough. You can add a small amount of warm (cold) water in advance, preheat (pre-cool) for about 1 minute to improve the warm (cold) insulation effect.
- If there is too little volume of beverage or ice in the bottle, increasing the volume will increase the insulation's effectiveness.
- Please check that the bottle is not damaged. Fill the bottle nearly full with boiling water. If after 20 to 30 minutes, the bottle is only warm to the touch, please contact the store where your purchased it.
What if there is an unpleasant odor?
- Please check whether there is grime in the bottle, Stopper Unit, or Lid Unit.
What if the seal discolors?
- If there is grime or mold on the product, please use oxygen bleach according to the How to Maintain Product instructions.
- If the grime or mold does not come off, please purchase a new seal.
Purchasing Parts
Please click here to find out how to purchase parts.
Heat/Cold Insulation
| Heat Insulation | (When using Stopper (with Cup)) 72°C and above (6 hours) |
|---|---|
| Cold Insulation | (When using Stopper (with Cup)) 10°C and below (6 hours) (When using Lid Unit) 10°C and below (6 hours) |
* Heat Insulation approximation based on room temperature of 20°C ± 2°C, filled with boiling water just under the Stopper Unit while the bottle is upright, with the Stopper Unit with Cup on when the water reaches 95°C ± 1°C. Water remains at that temperature for 6 hours.
* Cold Insulation approximation based on room temperature of 20°C ± 2°C, filled with ice water just under the Stopper Unit with Cup or Lid Unit while the bottle is upright, with the Stopper Unit with Cup or Lid Unit on when the water reaches 4°C ± 1°C. Water remains at that temperature for 6 hours.
Raw Resin and Materials Used
| Part Names | Raw Resin | Materials | |
|---|---|---|---|
| Inner Bottle | Stainless Steel | ||
| Shoulder | Polypropylene | ||
| Body | Stainless Steel (Acrylic Resin Coating) |
||
| Base | Polypropylene | ||
| Stopper (with Cup) | Stopper | Polypropylene | |
| Stopper Cap | Polypropylene | ||
| Stopper Lever | ABS Resin | ||
| Stopper Seal | Silicone Rubber | ||
| Cup | Polypropylene | ||
| Lid Unit | Lid | Polypropylene | |
| Cap | Polypropylene | ||
| Spout | Polypropylene | ||
| Cap Seal | Silicone Rubber | ||
| Lid Seal | Silicone Rubber | ||
- How to Maintain Mug Set
- How to Maintain Tableware Set・Baby Food Set
- How to Maintain Water Bottle with Straw
- How to Maintain 3-Piece Flatware Set
- How to Maintain 2 Way Stainless Steel Bottle
- How to Maintain Stainless Steel Bottle
- How to Maintain MIKI HOUSE Bear Stainless Steel Bottle
- How to Use MIKI HOUSE Pre-Walking Shoes
- MIKI HOUSE Shoes Instruction Guide
- All About School Shoes
- How to Maintain Bone China Products
- Instruction Manual for the Pull-Back Jet
- How to Maintain Friction Car
- How to Maintain Novelty Kids Watch
- How to Use GOLD LABEL Haircare Series